Using Closures to initialize properties in Swift

There are several ways to initialize and configure properties in Swift. In this week's Quick Tip, I would like to briefly highlight the possibility of using closures to initialize complex properties in your structs and classes. You will learn how you can use this approach of initializing properties, and when it's useful. Let's dive in with an example right away:

struct PicturesApi {
  private let dataPublisher: URLSession.DataTaskPublisher = {
    let url = URL(string: "https://mywebsite.com/pictures")!
    return URLSession.shared.dataTaskPublisher(for: url)
  }()
}

In this example, I create a URLSession.DataTaskPublisher object using a closure that is executed immediately when PicturesApi is instantiated. Even though this way of initializing a property looks very similar to a computed property, it's really more an inline function that runs once to give the property it's initial value. Note some of the key differences between this closure based style of initializing and using a computed property:

  • The closure is executed once when PicturesApi is initialized. A computed property is computed every time the property is accessed.
  • A computed property has to be var, the property in my example is let.
  • You don't put an = sign between the type of a computed property and the opening {. You do need this when initializing a property with a closure.
  • Note the () after the closing }. The () execute the closure immediately when PicturesApi is initialized. You don't use () for a computed property.

Using closures to initialize properties can be convenient for several reasons. One of those is shown in my earlier example. You cannot create an instance of URLSession.DataTaskPublisher without a URL. However, this URL is only needed by the data task publisher and nowhere else in my PicturesApi. I could define the URL as a private property on PicturesApi but that would somehow imply that the URL is relevant to PicturesApi while it's really not. It's only relevant to the data task that uses the URL. Using a closure based initialization strategy for my data task publisher allows me to put the URL close to the only point where I need it.

Tip:
Note that this approach of creating a data task is not something I would recommend for a complex or sophisticated networking layer. I wrote a post about architecting a networking layer a while ago and in general I would recommend that you follow this approach if you want to integrate a proper networking layer in your app.

Another reason to use closure based initialization could be to encapsulate bits of configuration for views. Consider the following example:

class SomeViewController: UIViewController {
  let mainStack: UIStackView = {
    let stackView = UIStackView()
    stackView.axis = .vertical
    stackView.spacing = 16
    return stackView
  }()

  let titleLabel: UILabel = {
    let label = UILabel()
    label.textColor = .red
    return label
  }()
}

In this example, the views are configured using a closure instead of configuring them all in viewDidLoad or some other place. Doing this will make the rest of your code much cleaner because the configuration for your views is close to where the view is defined rather than somewhere else in (hopefully) the same file. If you prefer to put all of your views in a custom view that's loaded in loadView instead of creating them in the view controller like I have, this approach looks equally nice in my opinion.

Closure based initializers can also be lazy so they can use other properties on the object they are defined on. Consider the following code:

class SomeViewController: UIViewController {
  let titleLabel: UILabel = {
    let label = UILabel()
    label.textColor = .red
    return label
  }()

  let subtitleLabel: UILabel = {
    let label = UILabel()
    label.textColor = .orange
    return label
  }()

  lazy var headerStack: UIStackView = {
    let stack = UIStackView(arrangedSubviews: [self.titleLabel, self.subtitleLabel])
    stack.axis = .vertical
    stack.spacing = 4
    return stack
  }()
}

By making headerStack lazy and closure based, it's possible to initialize it directly with its arranged subviews and configure it in one go. I really like this approach because it really keeps everything close together in a readable way. If you don't make headerStack lazy, the compiler will complain. You can't use properties of self before self is fully initialized. And if headerStack is not lazy, it needs to be initialized to consider self initialized. But if headerStack depends on properties of self to be initialized you run into problems. Making headerStack lazy solves these problems.

Closure based initialization is a convenient and powerful concept in Swift that I like to use a bunch in my projects. Keep in mind though, like every language features this feature can be overused. When used carefully, closures can really help clean up your code, and group logic together where possible. If you have any feedback or questions about this article, reach out on Twitter. I love to hear from you.

How to use SF Symbols in your apps

It’s been a while since Apple announced SF Symbols at WWDC 2019 and I remember how excited everybody was about them. The prospect of having an easy to integrate set of over 1,500 icons that you can display in nine weights sounds very appealing and has helped me prototype my ideas much quicker with good looking icons than ever before.

I haven’t heard or seen much content related to SF Symbols since they came out and I realized I hadn’t written about them at all so I figured that I’d give you some insight into SF Symbols and how you can integrate them in your app. By the end of this blog post you will know where to look for symbols, how you can integrate them and how you can configure them to fit your needs.

Browsing for symbols

The first step to using SF Symbols in your app is to figure out which symbols Apple provides, and which symbols you might need in your app. With over 1,500 symbols to choose from I’m pretty sure there will be one or more symbols that fit your needs.

To browse Apple’s SF Symbols catalog, you can download the official SF Symbols macOS app from Apple’s design resources. With this app you can find all of Apple’s symbols and you can easily view them in different weights, and you can see what they are called so you can use them in your app.

If you’d rather look for symbols in a web interface, you can use this website. Unfortunately, the website can’t show the actual symbols due to license restrictions. This means that you’ll have to look up the icons by name and use Apple’s SF Symbols app to see what they look like.

Once you’ve found a suitable symbol for your app, it’s time to use it. Let’s find out how exactly in the next section.

Using SF Symbols in your app

Using SF Symbols in your app is relatively straightforward with one huge caveat. SF Symbols are only available on iOS 13. This means that there is no way for you to use SF Symbols on iOS 12 and below. However, if your app supports iOS 13 and up (which in my opinion is entirely reasonable at this point) you can begin using SF Symbols immediately.

Once you’ve found a symbol you like, and know it’s name you can use it in your app as follows:

UIImage(systemName: "<SYMBOL NAME>")

Let's say you want to use a nice paintbrush symbol on a tab bar item, you could use the following code:

let paintbrushSymbol = UIImage(systemName: "paintbrush.fill")
let tabBarItem = UITabBarItem(title: "paint", 
                              image: paintbrushSymbol, 
                              selectedImage: nil)

Instances of SF Symbols are created as UIImage instances using the systemName argument instead of the named argument you might normally use. Pretty straightforward, right?

Find a symbol, copy its name and pass it to UIImage(systemName: ""). Simple and effective.

Configuring a symbol to fit your needs

SF Symbols can be configured to have different weights and scales. To apply a weight or scale, you apply a UIImage.SymbolConfiguration to the UIImage that will display your SF Symbol. For example, you change an SF Symbol's weight using the following code:

let configuration = UIImage.SymbolConfiguration(weight: .ultraLight)
let image = UIImage(systemName: "pencil", withConfiguration: configuration)

The above code creates an ultra light SF Symbol. You can use different weight settings from ultra light, all the way to black which is super bold. For a full overview of all available weights, refer to Apple's SF Symbols human interface guidelines.

In addition to changing a symbol's scale, you can also tweak its size by setting the symbol's scale. You can do this using the following code:

let configuration = UIImage.SymbolConfiguration(scale: .large)
let image = UIImage(systemName: "pencil", withConfiguration: configuration)

The code above applies a large scale to the symbol. You can choose between small, medium and large for your icon scale.

It's also possible to combine different configurations using the applying(_:) method on UIImage.SymbolConfiguration:

let lightConfiguration = UIImage.SymbolConfiguration(weight: .ultraLight)
let largeConfiguration = UIImage.SymbolConfiguration(scale: .large)

let combinedConfiguration = lightConfiguration.applying(largeConfiguration)

The above code creates a symbol configuration for an icon that is both ultra light and large.

One last thing I'd like to show you is how you can change an SF Symbol's color. If you're using a symbol in a tab bar, it will automatically be blue, or adapt to your tab bar's tint color. However, the default color for an SF Symbol is black. To use a different color, you can use the withTintColor(_:) method that's defined on UIImage to create a new image with the desired tint color. For example:

let defaultImage = UIImage(systemName: "pencil")!
let whiteImage = defaultImage.withTintColor(.white)

The above code can be used to create a white pencil icon that you can use wherever needed in your app.

In summary

In this week's post, you learned how you can find, use and configure Apple's SF Symbols in your apps. In my opinion, Apple did a great job implementing SF Symbols in a way that makes it extremely straightforward to use.

Unfortunately, this feature is iOS 13+ and the SF Symbols macOS app could be improved a little bit, but overall it's not too bad. I know that I'm using SF Symbols all the time in any experiments I do because they're available without any hassle.

If you have any questions, tips, tricks or feedback about this post don't hesitate to reach out on Twitter!

Find and copy Xcode device support files

Every once in a while I run into a situation where I update my iPhone to the latest iOS before I realize I'm still using an older version of Xcode for some projects. I usually realize this when Xcode tells me that it "Could not locate device support files". I'm sure many folks run into this problem.

Luckily, we can fix this by copying the device support files from the new Xcode over to the old Xcode, or by grabbing the device support files from an external source.

Copying device support files if you already have the latest Xcode installed

If you have the latest Xcode installed but need to use an older Xcode version to work on a specific project, you can safely copy the device support files from the new Xcode over to the old.

This can be done using the following command in your terminal:

cp -R /Applications/<new xcode>/Contents/Developer/Platforms/iPhoneOS.platform/DeviceSupport/<target ios> /Applications/<old xcode>/Contents/Developer/Platforms/iPhoneOS.platform/DeviceSupport/<target ios>

Make sure to replace <new xcode> with the path to your latest Xcode app, <old xcode> with your old Xcode app and <target ios> with the iOS version you wish to copy device support files for.

Tip:
I use xcversion to manage my Xcode installs. Read more in my post about having more than one Xcode version installed.

So for example, to copy device support files for iOS 13.4 from Xcode 11.4 to Xcode 11.3.1 you'd run the following command:

cp -R /Applications/Xcode-11.4.app/Contents/Developer/Platforms/iPhoneOS.platform/DeviceSupport/13.4 /Applications/Xcode-11.3.1.app/Contents/Developer/Platforms/iPhoneOS.platform/DeviceSupport/13.4

Let's look at the same command, formatted a little nicer:

cp -R \
  /Applications/Xcode-11.4.app/Contents/Developer/Platforms/iPhoneOS.platform/DeviceSupport/13.4 \
  /Applications/Xcode-11.3.1.app/Contents/Developer/Platforms/iPhoneOS.platform/DeviceSupport/13.4

Both of the above snippets copy iOS 13.4 support files from Xcode 11.4 to 11.3.1. After doing this, reboot Xcode (I always do just to be sure) and you should be able to run your Xcode 11.3.1 project on devices running iOS 13.4.

As an alternative to copying the files, you can also link them using the ln -s command in your terminal:

ln -s \
  /Applications/Xcode-11.4.app/Contents/Developer/Platforms/iPhoneOS.platform/DeviceSupport/13.4 \
  /Applications/Xcode-11.3.1.app/Contents/Developer/Platforms/iPhoneOS.platform/DeviceSupport/13.4

This command creates a symbolic link to the device support files instead of copying them. Both commands achieve the same result and are equally effective.

Obtaining device support files if you don't have the latest Xcode installed

Not everybody who needs device support files will have the latest Xcode available. If this is the case, I recommend that you take a look at this repository. It collects device support files for all iOS versions so you can clone that repository and copy, or link, device support files from that repository to the Xcode version you're using. You can use similar command to those that I showed in the previous section except you'd replace the old Xcode path with the path to the appropriate device support files in the clones repo.

Enforcing code consistency with SwiftLint

If you're ever amongst a group of developers and want to spark some intense discussion, all you need to do is call out that tabs are better than spaces. Or that indenting code with two spaces is much better than four. Or that the curly bracket after a function definition goes on the next line rather than on the same line as the method name.

A lot of us tend to get extremely passionate about our preferred coding styles and we're not afraid to discuss it in-depth. Which is fine, but this is not the kind of discussion you and your team should have for every PR that's made against your git repository. And you also don't want to explain and defend your coding style choices every time you have a new team member joins your team.

Luckily, developers don't just love arguing about their favorite code style. They also tend to get some joy out of building tools that solve tedious and repetitive problems. Enforcing a coding style is most certainly one of those tedious problems and for every sufficiently tedious problem, there is a tool to help you deal with that problem.

In this week's post, I would like to introduce you to a tool called SwiftLint. SwiftLint is used by developers all over the world to help them detect problems in how they style their code and to fix them. I will show you how you can add SwiftLint to your projects, configure it so it conforms to your wishes and how you can use it to automatically correct the problems it has found so you don't have to do this manually.

Adding SwiftLint to your project

Before you can use SwiftLint in your project, you need to install this. If you have Homebrew installed, you can install SwiftLint using the following command:

brew install swiftlint

Running this command will pull down and install the SwiftLint tool for you.

Once SwiftLint is installed, you can immediately begin using it by running the swiftlint command in your project folder from the Terminal.

Alternatively, you can add Swiftlint to your project using Cocoapods by adding the following line to your Podfile:

pod 'SwiftLint'

Using Cocoapods to install SwiftLint allows you to use different versions of SwiftLint for your projects and you can pinpoint specific releases instead of always using the latest release like Homebrew does.

After installing Swiftlint through Cocoapods, you can navigate to your project folder in terminal and run Pods/SwiftLint/swiftlint command to analyze your project with the SwiftLint version that was installed through Cocoapods.

Running Swiftlint with its default settings on a fresh project yields the following output:

❯ swiftlint
Linting Swift files at paths
Linting 'ViewController.swift' (1/3)
Linting 'AppDelegate.swift' (2/3)
Linting 'SceneDelegate.swift' (3/3)
/Users/dwals/Personal/SwiftLintDemo/SwiftLintDemo/ViewController.swift:20:1: warning: Trailing Newline Violation: Files should have a single trailing newline. (trailing_newline)
/Users/dwals/Personal/SwiftLintDemo/SwiftLintDemo/ViewController.swift:18:1: warning: Vertical Whitespace Violation: Limit vertical whitespace to a single empty line. Currently 2. (vertical_whitespace)
/Users/dwals/Personal/SwiftLintDemo/SwiftLintDemo/SceneDelegate.swift:16:1: warning: Line Length Violation: Line should be 120 characters or less: currently 125 characters (line_length)
/Users/dwals/Personal/SwiftLintDemo/SwiftLintDemo/SceneDelegate.swift:19:1: warning: Line Length Violation: Line should be 120 characters or less: currently 143 characters (line_length)
/Users/dwals/Personal/SwiftLintDemo/SwiftLintDemo/SceneDelegate.swift:27:1: warning: Line Length Violation: Line should be 120 characters or less: currently 137 characters (line_length)
/Users/dwals/Personal/SwiftLintDemo/SwiftLintDemo/SceneDelegate.swift:53:1: warning: Trailing Newline Violation: Files should have a single trailing newline. (trailing_newline)
/Users/dwals/Personal/SwiftLintDemo/SwiftLintDemo/SceneDelegate.swift:20:15: warning: Unused Optional Binding Violation: Prefer `!= nil` over `let _ =` (unused_optional_binding)
/Users/dwals/Personal/SwiftLintDemo/SwiftLintDemo/SceneDelegate.swift:15:1: warning: Vertical Whitespace Violation: Limit vertical whitespace to a single empty line. Currently 2. (vertical_whitespace)
/Users/dwals/Personal/SwiftLintDemo/SwiftLintDemo/SceneDelegate.swift:51:1: warning: Vertical Whitespace Violation: Limit vertical whitespace to a single empty line. Currently 2. (vertical_whitespace)
/Users/dwals/Personal/SwiftLintDemo/SwiftLintDemo/AppDelegate.swift:16:1: warning: Line Length Violation: Line should be 120 characters or less: currently 143 characters (line_length)
/Users/dwals/Personal/SwiftLintDemo/SwiftLintDemo/AppDelegate.swift:23:1: warning: Line Length Violation: Line should be 120 characters or less: currently 177 characters (line_length)
/Users/dwals/Personal/SwiftLintDemo/SwiftLintDemo/AppDelegate.swift:31:1: warning: Line Length Violation: Line should be 120 characters or less: currently 153 characters (line_length)
/Users/dwals/Personal/SwiftLintDemo/SwiftLintDemo/AppDelegate.swift:37:1: warning: Trailing Newline Violation: Files should have a single trailing newline. (trailing_newline)
/Users/dwals/Personal/SwiftLintDemo/SwiftLintDemo/AppDelegate.swift:15:1: warning: Vertical Whitespace Violation: Limit vertical whitespace to a single empty line. Currently 3. (vertical_whitespace)
/Users/dwals/Personal/SwiftLintDemo/SwiftLintDemo/AppDelegate.swift:35:1: warning: Vertical Whitespace Violation: Limit vertical whitespace to a single empty line. Currently 2. (vertical_whitespace)
Done linting! Found 15 violations, 0 serious in 3 files.

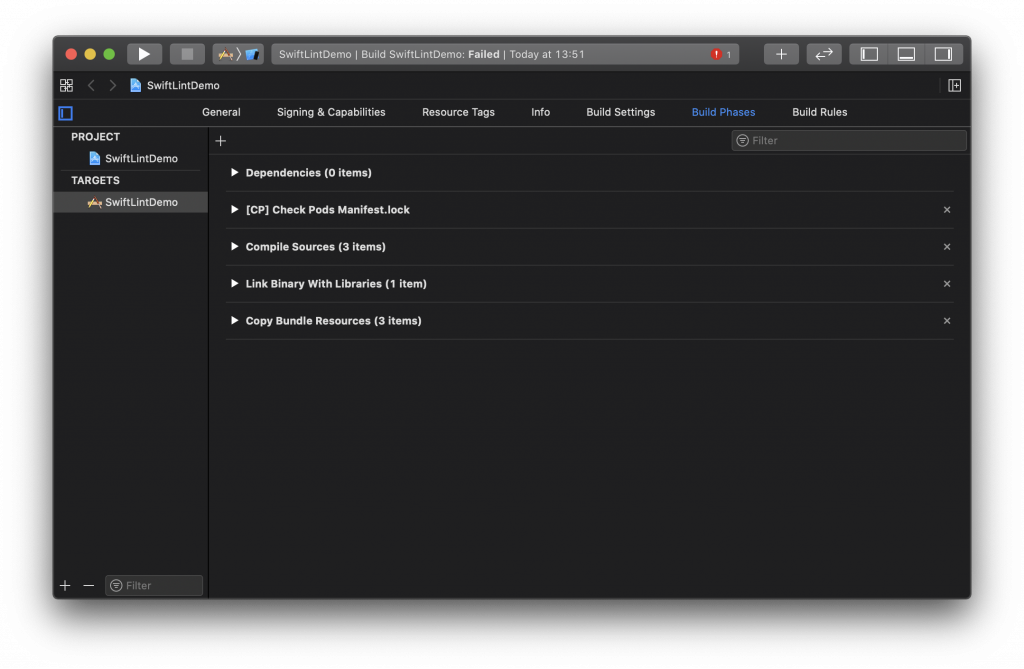
While it's nice that we can run SwiftLint on the command line, it's much nicer if SwiftLint's output was shown directly in Xcode, and if SwiftLint would run automatically for every build action. You can achieve this by adding a new Run Script Phase to your project's Build Phases tab:

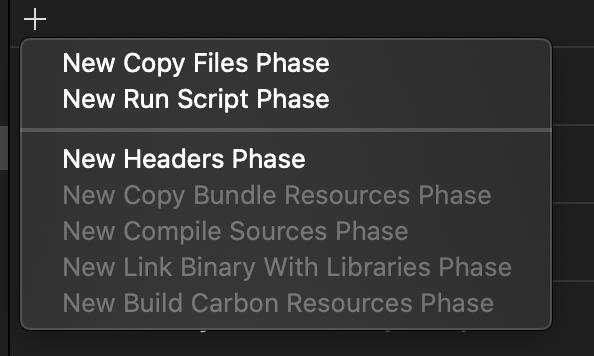
Click the + icon and select New Run Script Phase:

Open the newly added Run Script step and add the following code to it:

if which swiftlint >/dev/null; then
  swiftlint
else
  echo "warning: SwiftLint not installed, download from https://github.com/realm/SwiftLint"
fi

Your step should look like this in Xcode:

If you're running SwiftLint with CocoaPods, your Run Script Phase should look as follows:

"${PODS_ROOT}/SwiftLint/swiftlint"

The earlier version of the Run Script Phase would execute the globally installed SwiftLint version rather than the one that's installed by Cocoapods.

After setting up your build phase, Xcode will run Swiftlint after every build and show you inline warnings and errors where appropriate. This is much more convenient than using the terminal to run Swiftlint and figuring out what errors go where.

Setting up custom SwiftLint rules

SwiftLint can do some really good work to help you write better code, and it's quite smart about it too. For example, SwiftLint will urge you to use array.isEmpty over array.count == 0. It will also prefer that you use myVar != nil over let _ = myVar and more. For a complete list of SwiftLint's rules, you can look at this page. There are a ton of rules so I won't cover them in this post. It's just too much.

Every rule in the rule directory comes with a comprehensive page that explains what the rule does, and whether it's enforced in the default configuration. One rule that I kind of dislike is the Line Length rule. I use a marker in Xcode that suggests a certain line length but I don't want SwiftLint to enforce this rule. Based on the directory page for this rule, you can find out that it's enabled by default, that it warns you for a line length of 120 characters or longers and that it throws an error for 200 characters or more. Additionally, this rule applies to urls, comments, function declarations and any other code you write.

You can disable or customize this rule in a .swiftlint.yml file (note the . in front of the filename). Even though I dislike the line length rule, other members of my team might really like it. After thorough discussions, we might decide that this rule should not apply to URLs and comments, it should warn at 140 characters and it should throw an error at 240 characters.

To set this up, you need to add a .swiftlint.yml file to your project directory. Note that this file should be added alongside your Xcode project and your Xcode workspace. It should not be placed inside of your project files directory. SwiftLint expects your .swiftlint.yml file to exist in the same directory that you'll run SwiftLint from which, in this case, is the folder that contains your Xcode project.

To set up the line length rule to behave as I mentioned, add the following contents to .swiftlint.yml:

line_length:
  warning: 140
  error: 240
  ignores_comments: true
  ignores_urls: true

To configure a specific rule, you create a new yaml node with the rule name. Inside of that node you can add the configuration for that specific rule. It's also possible to provide lists of enabled and disabled rules in your .swiftlint.yml file:

disabled_rules:
  unused_optional_binding

opt_in_rules:
  empty_count

Each enabled or disabled rule should be listed on a new line under its respective node. You can find the identifiers for all SwiftLint rules in the rules directory.

If you don't want to run SwiftLint on all of your source files, you can specify a list of excluded folders or files in .swiftlint.yml as follows:

excluded:
  Pods
  Carthage

You can use patterns like Sources/*/MyFiles.swift to match wildcards if needed.

For a complete list of possible yaml configuration keys, refer to the SwiftLint repository.

Sometimes you don't want to opt-out of a rule completely but you want to make an exception. If this is the case, you can specify this for a complete file, for a line, or a block of code. A full overview with examples is available in the SwiftLint repository but I'll include a brief overview here.

The following code disables the line length rule from the moment this comment is found, until the end of the file or until the rule is explicitly enabled again. You can specify multiple rules separated by a space.

// swiftlint:disable line_length

If you want to (re-)enable a specific SwiftLint rule you can write the following comment in your code:

// swiftlint:enable line_length

You can also use comments to enable the next, previous or current violation of a SwiftLint rule. I took the following example from the SwiftLint repository:

// swiftlint:disable:next force_cast
let noWarning = NSNumber() as! Int
let hasWarning = NSNumber() as! Int
let noWarning2 = NSNumber() as! Int // swiftlint:disable:this force_cast
let noWarning3 = NSNumber() as! Int
// swiftlint:disable:previous force_cast

Determining which SwiftLint rules you should apply to your codebase is a highly personal decision that you should consider carefully with your team.

If your project runs on CI, SwiftLint will automatically run when your CI builds your project so there's no additional work for you there. If you want to run SwiftLint only on CI, you can remove the Run Script Phase from your Xcode project and run SwiftLint directly using the steps mentioned at the start of this section.

Using SwiftLint to fix your code automatically

Some of SwiftLint's rules support automated corrections. You can execute SwiftLint's automated corrections using the following command:

swiftlint autocorrect

If you're using SwiftLint through Cocoapods you'll want to use the following command instead:

Pods/SwiftLint/swiftlint autocorrect

This command will immediately make changes to your source files without asking for permission. I highly recommend you to commit any uncommitted changes in your projects to git before running autocorrect. This will allow you to see exactly what SwiftLint change, and you will be able to undo any undesired actions easily.

In Summary

This week, you learned about SwiftLint and how you can add it to your projects to automatically ensure that everybody on your team sticks to the same coding style. A tool like SwiftLint removes discussions and bias from your workflow because SwiftLint tells you when your code does not meet your team's standards. This means that you spend less time pointing out styling mistakes in your PRs, and you don't have to sit down with every new team member to explain (and defend) every stylistic choice you made in your codebase. Instead, everybody can look at the SwiftLint file and understand what decision the team has made.

I showed you how you can set up your .swiftlint.yml configuration file, and how you can apply specific exceptions in your code where needed. Keep in mind that you should not find yourself adding these kinds of exceptions to your code regularly. If this is the case, you should probably add a new rule to your SwiftLint configuration, or remove an existing rule from it.

Lastly, you learned about the autocorrect command that will automatically fix any SwiftLint warnings and errors where possible.

If you have any questions or feedback for me don't hesitate to send me a Tweet.

Calculating the difference in hours between two dates in Swift

Sometimes you need to calculate the difference between two dates in a specific format. For instance, you might need to know the difference between dates in hours. Or maybe you want to find out how many days there are between two dates. One approach for this would be to determine the number of seconds between two dates using timeIntervalSince:

let differenceInSeconds = lhs.timeIntervalSince(rhs)

You could use this difference in seconds to convert to hours, minutes or any other unit you might need. But we can do better in Swift using DateComponents. Given two dates, you can get the difference in hours using the following code:

let diffComponents = Calendar.current.dateComponents([.hour], from: startDate, to: endDate)
let hours = diffComponents.hour

The hour property on diffComponents will give you the number of full hours between two dates. This means that a difference of two and a half hours will be reported as two.

If you're looking for the difference between two dates in hours and minutes, you can use the following code:

let diffComponents = Calendar.current.dateComponents([.hour, .minute], from: lhs, to: rhs)
let hours = diffComponents.hour
let minutes = diffComponents.minute

If the dates are two and a half hours apart, this would give you 2 for the hour component, and 30 for the minute component.

This way of calculating a difference is pretty smart. If you want to know the difference in minutes and seconds, you could use the following code:

let diffComponents = Calendar.current.dateComponents([.minute, .second], from: lhs, to: rhs)
let minutes = diffComponents.minute
let seconds = diffComponents.second

Considering the same input where the dates are exactly two and a half hours apart, this will give you 150 for the minute component and 0 for the second component. It knows that there is no hour component so it will report 150 minutes instead of 30.

You can use any date component unit for this time of calculation. Some examples include years, days, nanoseconds and even eras.

Date components are a powerful way to work with dates and I highly recommend using this approach instead of doing math with timeIntervalSince because DateComponents are typically far more accurate.

If you have questions or feedback about this tip, feel free to shoot me a Tweet.

Adding your app’s content to Spotlight

On iOS, you can swipe down on the home screen to access the powerful Spotlight search feature. Users can type queries in Spotlight and it will search through several areas of the system for results. You may have noticed that Spotlight includes iMessage conversations, emails, websites, and more. As an app developer, you can add content from your app to the Spotlight search index so your users can find results that exist in your app through Spotlight.

An important aspect of the Spotlight index is that you can choose whether you want to index your app contents publicly, or privately. In this post, you will learn what that means and how it works.

All in all, this post covers the following topics:

  • Adding content to Spotlight
  • Adding Spotlight search as an entry point for your app

By the end of this post, you will know everything you need to know to add your app's content to the iOS Spotlight index to enhance your app's discoverability.

Adding content to Spotlight

There are several mechanisms that you can utilize to add content to Spotlight. I will cover two of them in this section:

  • NSUserActivity
  • CSSearchableItem

For both mechanisms, you can choose whether your content should be indexed publicly, or privately. When you index something privately, the indexed data does not leave the user's device and it's only added to your user's Spotlight index. When you choose to index an item publicly, a hash of the indexed item is sent to Apple's servers. When other user's devices start sending the same hash to Apple's servers, Apple will begin recognizing your indexed item as useful, or important. Note that having many users send the same item once doesn't mean much to Apple. They are looking for indexes items that are accessed regularly by each user.

I don't know the exact thresholds Apple maintains, but once a certain threshold is reached, Apple will add the publicly indexed item to Spotlight for users that have your app but may not have accessed the content you have indexed for other users. If your indexed items include a Universal Link URL, your indexed item can even appear in Safari's search results if the user doesn't have your app installed yet. This means that adding content to the Spotlight index and doing so accurately and honestly, can really boost your app's discoverability because you might appear in places on a user's where you otherwise would not have.

Adding content to Spotlight using NSUserActivity

The NSUserActivity class is used for many activity related objects in iOS. It's used for Siri Shortcuts, to encapsulate deeplinks, to add content to Spotlight and more. If you're familiar with NSUserActivity, the following code should look very familiar to you:

let userActivity = NSUserActivity(activityType: "com.donnywals.example")
userActivity.title = "This is an example"
activity.persistentIdentifier = "example-identifier"
userActivity.isEligibleForSearch = true // add this item to the Spotlight index
userActivity.isEligibleForPublicIndexing = true // add this item to the public index
userActivity.becomeCurrent() // making this the current user activity will index it

As you can see, creating and indexing an NSUserActivity object is relatively straightforward. I've only used a single attribute of the user activity. If you want to index your app's content, there are several other fields you might want to populate. For example, contentAttributeSet, keywords and webpageURL. I strongly recommend that you look at these properties in the documentation for NSUserActivity and populate them if you can. You don't have to though. You can use the code I've shown you above and your indexed user activities should pop up in Spotlight pretty much immediately.

User activities are ideally connected to the screens a user visits in your app. For instance, you can register them in viewDidAppear and set the created user activity to be the view controllers activity before calling becomeCurrent:

self.userActivity = userActivity
self.userActivity?.becomeCurrent()

You should do this every time your user visits the screen that the user activity belongs to. By doing this, the current user activity is always the true current user activity, and iOS will get a sense of the most important and often used screens in your app. This will impact the Spotlight search result ranking of the indexed user activity. Items that are used regularly rank higher than items that aren't used regularly.

Adding content to Spotlight using CSSearchableItem

A CSSearchableItem is typically not connected to a screen like user activities are. Ultimately a CSSearchableItem of course belongs to some kind screen, but what I mean is that the moment of indexing a CSSearchableItem is not always connected to a user visiting a screen in your app. If your app has a large database of content, you can use CSSearchableItem instances to index your content in Spotlight immediately.

Attributes for a CSSearchableItem are defined in a CSSearchableItemAttributeSet. An attribute set can contain a ton of metadata about your content. You can add start dates, end dates, GPS coordinates, a thumbnail, rating and more. Depending on the fields you populate, iOS will render your indexed item differently. When you add content to Spotlight, make sure you provide as much content as possible. For a full overview of the properties that you can set, refer to Apple's documentation. You can assign an attribute set to the contentAttributeSet property on NSUserActivity to make it as rich as a CSSearchableItem is by default.

You can create an instance of CSSearchableItemAttributeSet as follows:

import CoreSpotlight // don't forget to import CoreSpotlight at the top of your file
import MobileCoreServices // needed for kUTTypeText

let attributes = CSSearchableItemAttributeSet(itemContentType: "com.donnywals.favoriteMovies")
attributes.title = indexedMovie.title
attrs.contentType = kUTTypeText as String
attributes.contentDescription = indexedMovie.description
attributes.identifier = indexedMovie.id
attributes.relatedUniqueIdentifier = indexedMovie.id

In this example, I'm using a made-up indexedMovie object to add to the Spotlight index. I haven't populated a lot of the fields that I could have populated because I wanted to keep this example brief. The most interesting bits here are the identifier and the relatedUniqueIdentifier. Because you can index items through both NSUserActivity and CSSearchableItem, you need a way to tell Spotlight when two items are really the same item. You can do this bu setting the searchable attributes' relatedUniqueIdentifier to the same value you'd use for the user activity's persistentIdentifier property. When Spotlight discovers a searchable item whose's attributes contain a relatedUniqueIdentifier that corresponds with a previously indexed user activity's persistentIdentifier, Spotlight will know to not re-index the item but instead, it will update the existing item.

Important!:
When you add a new item to Spotlight, make sure to assign a value to contentType. In my tests, the index does not complain or throw errors when you index an item without a contentType, but the item will not show up in the Spotlight index. Adding a contentType fixes this.

Once you've prepared your searchable attributes, you need to create and index your searchable item. You can do this as follows:

let item = CSSearchableItem(uniqueIdentifier: "movie-\(indexMovie.id)", domainIdentifier: "favoriteMovies", attributeSet: attributes)

The searchable item initializer takes three arguments. First, it needs a unique identifier. This identifier needs to be unique throughout your app so it should be more specialized than just the identifier for the indexed item. Second, you can optionally pas a domain identifier. By using domains for the items you index, you can separate some of the indexed data which will allow you to clear certain groups of items from the index if needed. And lastly, the searchable attributes are passed to the searchable item. To index the item, you can use the following code:

CSSearchableIndex.default().indexSearchableItems([item], completionHandler: { error in
  if let error = error {
    // something went wrong while indexing
  }
})

Pretty straightforward, right? When adding items to the Spotlight index like this, make sure you add the item every time the user interacts with it. Similar to user activities, iOS will derive importance from the way a user interacts with your indexed item.

Note that we can't choose to index searchable items publicly. Public indexing is reserved for user activities only.

When you ask Spotlight to index items for your app, the items should become available quickly after indexing them. Try swiping down on the home screen and typing the title of an item you've indexed. It should appear in Spotlights search results and you can tap the result to go to your app. However, nothing really happens when your app opens. You still need a way to handle the Spotlight result so your user is taken to the screen in your app that displays the content they've tapped.

Showing the correct content when a user enters your app through Spotlight

Tip:
I'm going to assume you've read my post on handling deeplinks or that you know how to handle deeplinks in your app. A lot of the same principles apply here and I want to avoid explaining the same thing twice. What's most important to understand is which SceneDelegate and AppDelegate methods are called when a user enters your app via a deeplink, and how you can navigate to the correct screen.

In this section, I will only explain the Spotlight specific bits of opening a user activity or searchable item. The code needed to handle Spotlight search items is very similar to the code that handles deeplinks so your knowledge about handling deeplinks carries over to Spotlight nicely.

Your app can be opened to handle a user activity or a searchable item. How you handle them varies slightly. Let's look at user activity first because that's the simplest one to handle.

When your app is launched to handle any kind of user activity, the flow is the same. The activity is passed to scene(_:continue:) if your app is already running in the background, or through connectionOptions.userActivities in scene(_:willConnectTo:options:) if your app is launched to handle a user activity. If you're not using the SceneDelegate, your AppDelegate's application(_:continue:restorationHandler:) method is called, or the user activity is available through UIApplicationLaunchOptionsUserActivityKey on the application's launch options.

Once you've obtained a user activity, it's exposed to you in the exact same way as you created it. So for the user activity I showed you earlier, I could use the following code to handle the user activity in my scene(_:continue:) method:

func scene(_ scene: UIScene, continue userActivity: NSUserActivity) {
  if userActivity.activityType == "com.donnywals.example",
    let screenIdentifier = userActivity.persistentIdentifier {

    // navigate to screen
  }
}

In my post on handling deeplinks I describe some techniques for navigating to the correct screen when handling a deeplink, and I also describe how you can handle a user activity from scene(_:willConnectTo:options:). I recommend reading that post if you're not sure how to tackle these steps because I want to avoid explaining the same principle in two posts.

When your app is opened to handle a spotlight item, it will also be asked to handle a user activity. This user activity will look slightly different. The user activity's acitivityType will equal CSSearchableItemActionType. Furthermore, the user activity will not expose any of its searchable attributes. Instead, you can extract the item's unique identifier that you passed to the CSSearchableItem initializer. Based on this unique identifier you will need to find and initialize the content and screen a user wants to visit. You can use the following code to detect the searchable item and extract its unique identifier:

if userActivity.activityType == CSSearchableItemActionType,
  let itemIdentifier = userActivity.userInfo?[CSSearchableItemActivityIdentifier] as? String {

  // handle item with identifier
}

Again, the steps from here are similar to how you'd handle a deeplink with the main difference being how you find content. If you're using Core Data or Firebase, you will probably want to use the item identifier to query your database for the required item. If your item is hosted online, you will want to make an API call to fetch the item with the desired item identifier. Once the item is obtained you can show the appropriate screen in your app.

In Summary

In this week's post, you learned how you can index your app's content in iOS' Spotlight index. I showed you how you can use user activities and searchable items to add your app's content to Spotlight. Doing this will make your app show up in many more places in the system, and can help your user discover content in your app.

If you want to learn much more about Spotlight's index, I have a full chapter dedicated to it in my book Mastering iOS 12 Development. While this book isn't updated for iOS 13 and the Scene Delegate, I think it's still a good reference to help you make sense of Spotlight and what you can do with it.

If you have any questions or feedback about this post, don't hesitate to reach out to me on Twitter.

Removing duplicate values from an array in Swift

Arrays in Swift can hold on to all kinds of data. A common desire developers have when they use arrays, is to remove duplicate values from their arrays. Doing this is, unfortunately, not trivial. Objects that you store in an array are not guaranteed to be comparable. This means that it's not always possible to determine whether two objects are the same. For example, the following model is not comparable:

struct Point {
  let x: Int
  let y: Int
}

However, a keen eye might notice that two instances of Point could easily be compared and two points that are equal would have the same x and y values. Before you can remove defaults from an array, you should consider implementing Equatable for the object you're storing in your array so we can use the == operator to compare them:

extension Point: Equatable {
  static func ==(lhs: Point, rhs: Point) -> Bool {
    return lhs.x == rhs.x && lhs.y == rhs.y
  }
}

Once you've determined that you're dealing with Equatable objects, you can define an extension on Array that will help you remove duplicate values as follows:

extension Array where Element: Equatable {
  func uniqueElements() -> [Element] {
    var out = [Element]()

    for element in self {
      if !out.contains(element) {
        out.append(element)
      }
    }

    return out
  }
}

This way of removing duplicates from your array is not very efficient. You have to loop through all of the elements in the array to build a new array and every call to contains loops through the out array. This isn't ideal and in some cases we can do better.

I say some cases because the more optimal solution requires that the element in your array conforms to Hashable. For the Point struct I showed you earlier this is easy to achieve. Since Point only has Int properties and Int is Hashable, Swift can synthesize an implementation of Hashable when we conform Point to Hashable:

extension Point: Hashable {}

If the elements in your array are already hashable, you don't have to declare this extension yourself.

For an array of hashable elements, we can use the following implementation of uniqueElements():

extension Array where Element: Hashable {
  func uniqueElements() -> [Element] {
    var seen = Set<Element>()
    var out = [Element]()

    for element in self {
      if !seen.contains(element) {
        out.append(element)
        seen.insert(element)
      }
    }

    return out
  }
}

This code looks very similar to the previous version but don't be fooled. It's much better. Note that I defined a Set<Element> in this updated implementation. A Set enforces uniqueness and allows us to look up elements in constant time. This means that seen.contains(element) doesn't have to loop over all elements in the set to find the element you're looking for. This is a buge improvement over the Equatable version of this algorithm because it removes an entire nested loop (which is hidden in contains) from our implementation. Note that the loop from this code can be cleaned up a bit with a compactMap instead of a for loop. This doesn't change the performance but I think it looks a bit nicer:

extension Array where Element: Hashable {
  func uniqueElements() -> [Element] {
    var seen = Set<Element>()

    return self.compactMap { element in
      guard !seen.contains(element)
        else { return nil }

      seen.insert(element)
      return element
    }
  }
}

Functionally these two implementations are the same, and they also have the same performance characteristics so pick whichever one you like.

There is one more way of implementing uniqueElements() for an array of Hashable elements that is even more efficient. It does come with one caveat though. When you use this last version, you might lose the order of your original array which means you should only use this version if you don't care about the ordering of your array:

extension Array where Element: Hashable {
  func unsortedUniqueElements() -> [Element] {
    let set = Set(self)
    return Array(set)
  }
}

By converting the array to a Set, all duplicate values are automatically dropped from the array. We can then convert the set back to an array to get an array with all duplicate values removed. Because sets don't enforce any ordering, you might lose the original order of your array. The previous two versions of uniqueElements preserved the ordering of your input. You should use this version if you need your array's order to be preserved. If you don't care about order and your elements are Hashable I would recommend to use the Set approach I showed last.

I hope this quick tip gave you some useful insights into arrays and how you can deduplicate them. If you have questions, feedback or alternative solutions don't hesitate to reach out on Twitter.

Profiling and debugging your Combine code with Timelane

When we write code, we write bugs. It's one of the laws of the universe that we can't seem to escape. The tools we have to discover, analyze and fix these bugs are extremely important because without good debugging tools we'd be poking at a black box until we kind of figure out what might be happening in our code. Debugging synchronous code is hard enough already, but once your code involves several streams of asynchronous work debugging becomes much harder because asynchronous code can be inherently hard to keep track of.

Combine code is asynchronous by nature. When you use Combine to receive or send values, you're dealing with an asynchronous stream of values that will (or will not) output information over time. One way to gain insight into what your Combine code is doing is to use Combine's print operator which will print information to Xcode's console. While this is fine if you're debugging one stream at a time, the console can become unwieldy quickly when you're logging information on multiple subscriptions or if you're logging lots of information that's not necessarily related to Combine.

In this week's blog post I'd like to take a closer look at Marin Todorov's super helpful Timeline instrument that helps you gain insight into Combine code by visualizing what your Combine code is doing in realtime. By the end of this post, you will know how to install, configure and use Timelane in your projects.

Preparing to use Timelane

To use Timelane, there are two things you need to do. First, you need to install the Instruments template that is used to visualize your data streams. Second, you need to add the TimelaneCore and TimelaneCombine dependencies to your project. Note that there is also a RxTimelane framework available that allows you to use Timelane to profile RxSwift code. In this post, I will focus on Combine but the RxSwift version works in the same manner as the Combine version.

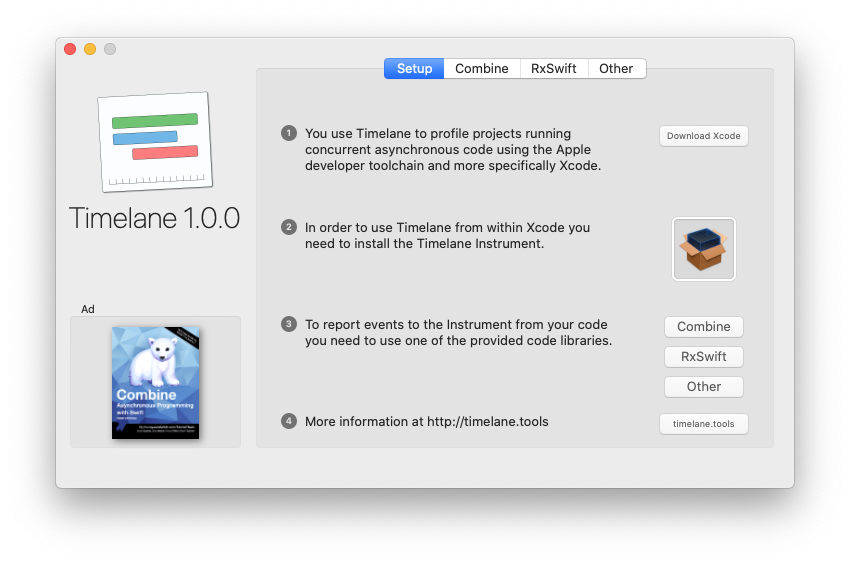
To install the Timelane Instruments template, go to the Timelane releases page on Github and download the Timelane app zip file. Open the downloaded application and follow the installation instructions shown in the app:

Screenshot of the Timelane installer app

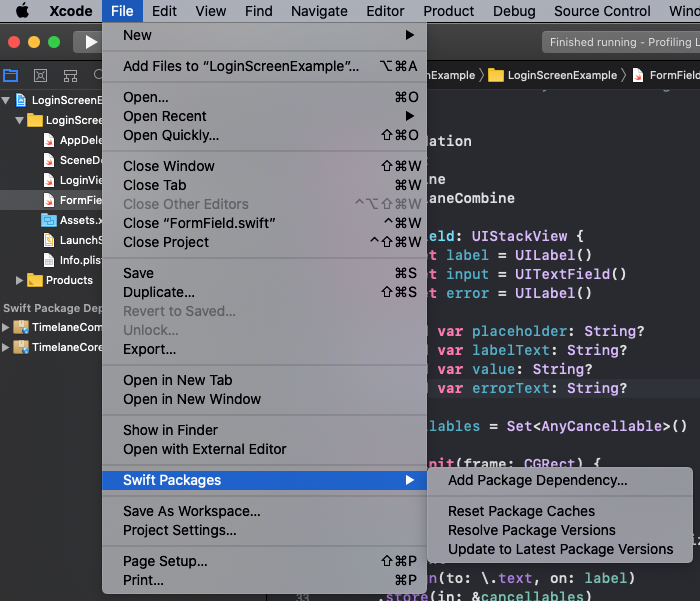
After installing the Instruments template, you can go ahead and open Xcode. The easiest way to integrate Timelane is through the Swift Package Manager. Open the project you want to use Timelane in and navigate to File -> Swift Packages -> Add Package Dependency.

Screenshot of the Xcode menu to access Swift Package Manager

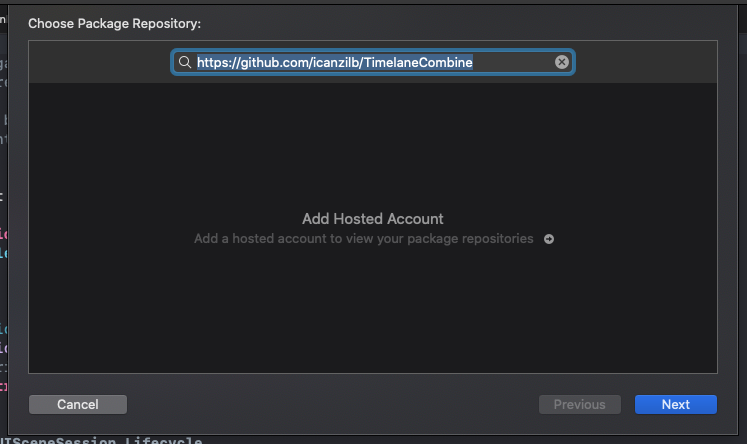
In the pop-up that appears, enter the TimelaneCombine Github URL which is: https://github.com/icanzilb/TimelaneCombine.

Screenshot of the Add Package screen with the TimelaneCombine URL prefilled

Adding this package to your project will automatically pull down and install the TimelaneCombine and TimelaneCore packages in your project. If you're using Cocoapods or Carthage to manage your dependencies you can add the TimelaneCombine dependency to your Podfile or Cartfile as needed.

Debugging subscriptions with Timelane

Once you have all the required dependencies in place, you can begin profiling your Combine code quite easily. All you need to do is add a call to Timelane's lane operator after the publisher you want to debug and you're good to go. For example, if you have a publisher in your project that downloads data from the web and decodes it into a JSON model, you might use the following code to set up Timelane to make sure your code works as expected:

URLSession.shared.dataTaskPublisher(for: URL(string: "https://donnywals.com")!)
  .map(\.data)
  .decode(type: SomeModel.self, decoder: JSONDecoder())
  .lane("Decoding data")
  .sink(receiveCompletion: { _ in }, receiveValue: { value in
    print(value)
  })
  .store(in: &cancellables)

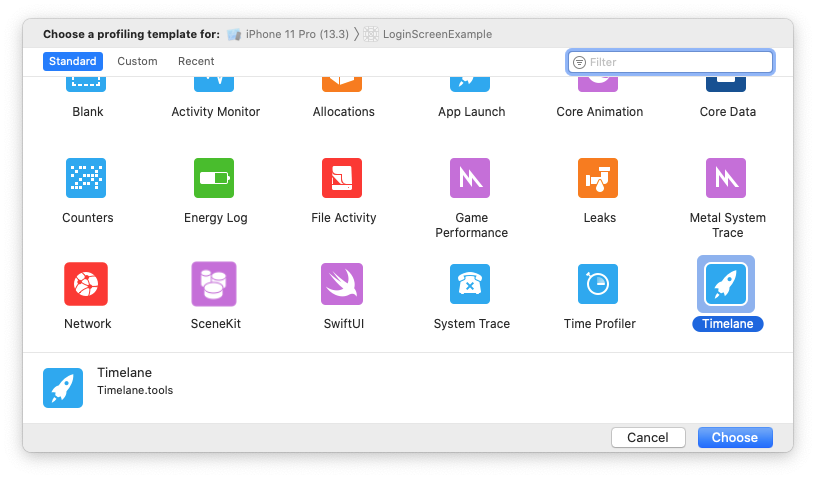
Note that most code can be written just like you would write it normally. All you need to do to profile your code is add a call to the lane operator and provide a name for the lane you want to visualize the publisher stream in. To debug this code, you need to run your app with Instruments enabled. To do this go to Product -> Profile or press cmd + i. When your project is compiled, Instruments will ask you to choose a template for your profiling session. Make sure you choose the Timelane template:

Instruments' template selection window

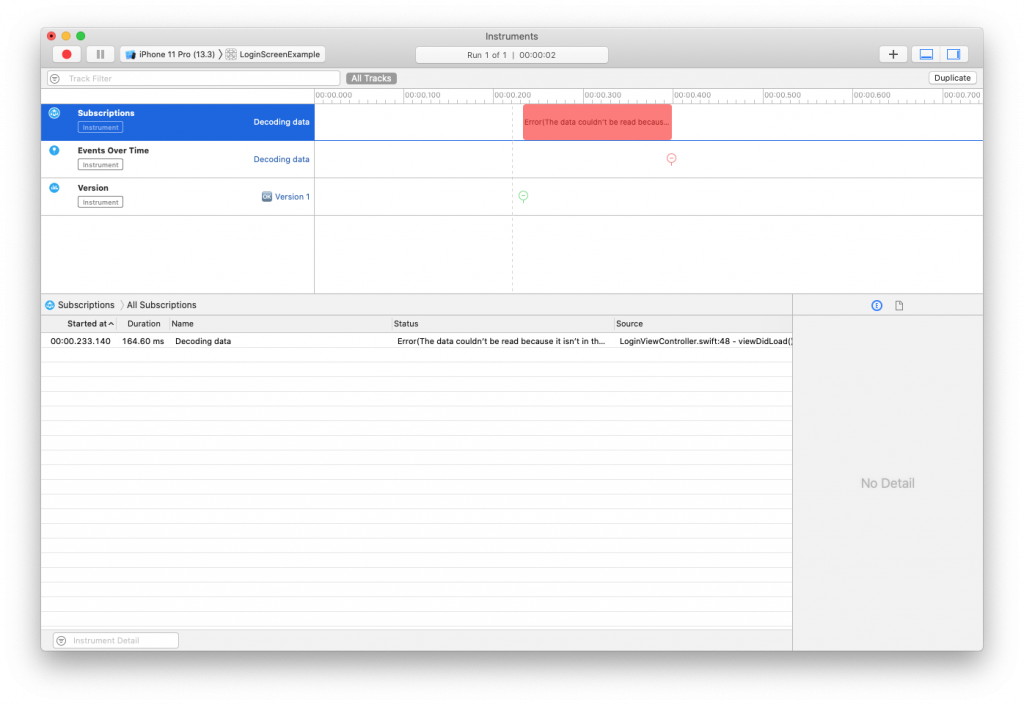
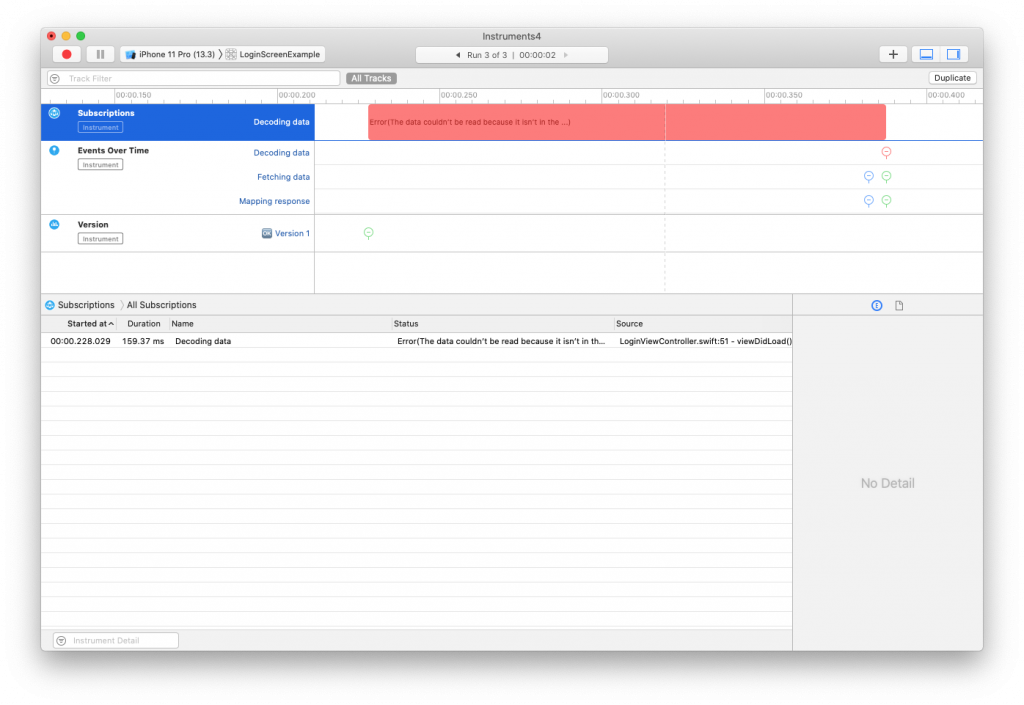
Instruments will open the template and you can start your profiling session by pressing the record button in the top left corner of the window. You will see that Timelane will immediately visualize your publishers in realtime. The output for the code above looks as follows:

Example of a single, simple Timelane log

You can see that the stream failed because the subscription finished with an error. You can even see why. The loaded data wasn't in the correct format. This makes sense because I loaded the homepage of this website, which is HTML and I tried to decode it as JSON.

It's possible to visualize multiple steps of a single chain of publishers to see where exactly things go wrong. For example, you can add the lane operators to every step of the chain I showed earlier:

URLSession.shared.dataTaskPublisher(for: URL(string: "https://donnywals.com")!)
  .lane("Fetching data")
  .map(\.data)
  .lane("Mapping response")
  .decode(type: SomeModel.self, decoder: JSONDecoder())
  .lane("Decoding data")
  .sink(receiveCompletion: { _ in }, receiveValue: { value in
    print(value)
  })
  .store(in: &cancellables)

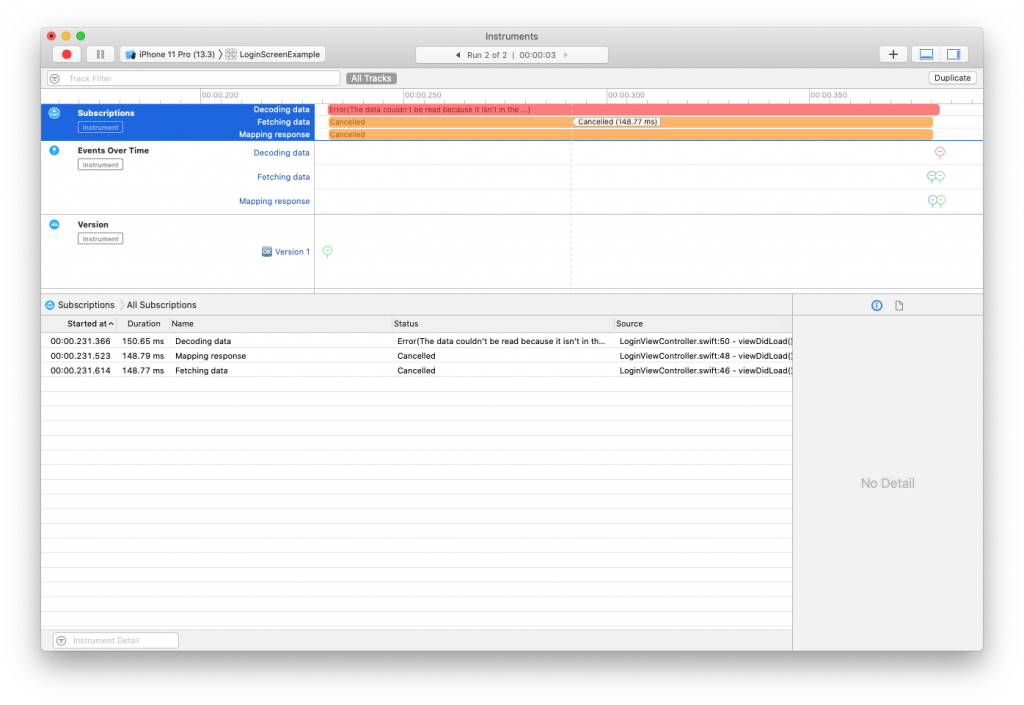
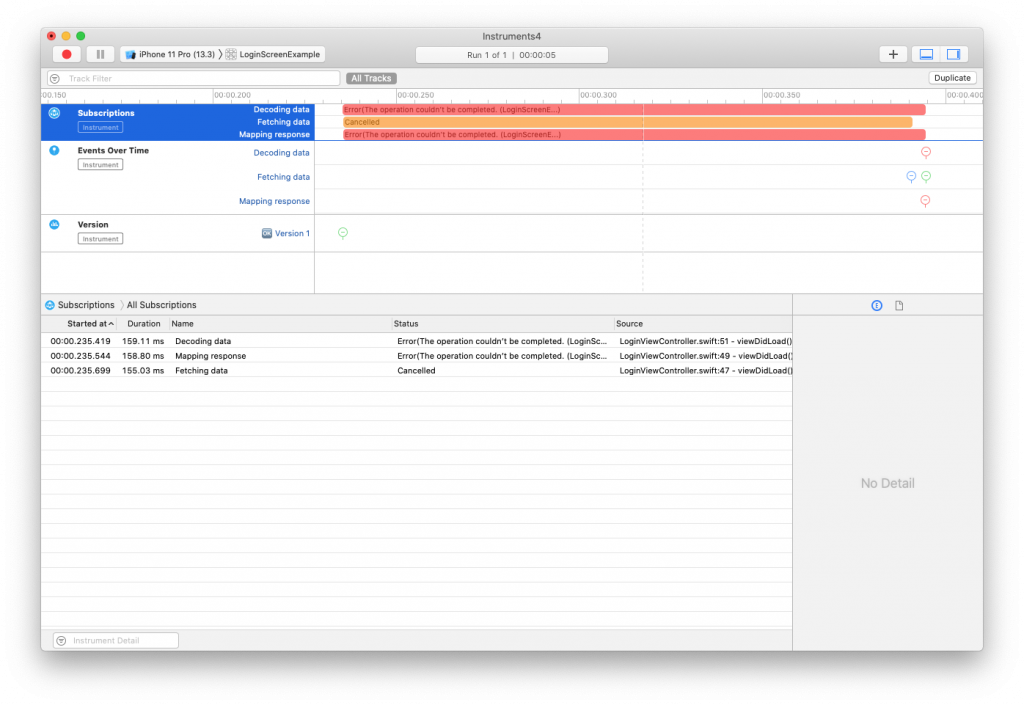
If you'd run Instruments with this code, you would see the following output:

Screenshot of multiple subscription and event lanes

There are now multiple subscription lanes active and you can see that there are values for each subscription lane. Note that the two lanes we just added get canceled because decode fails. This is a detail in Combine that I would not have known about without profiling my code using Timeline. It might be an insignificant detail in the grand scheme of things but it's pretty neat either way.

In this case, you might not be interested in seeing a subscription lane for each lane operator you use. After all, all three lanes I created in the code I just showed you are tightly related to each other. And if any publisher in the chain throws an error, this error will travel through all downstream operators before it reaches the sink. This allows you to see exactly which publisher in the chain threw an error, but it also creates some visual noise that you may or may not be interested in. Here's an example of what happens when I replace the map from the example code with a tryMap and throw an error:

Screenshot of two lanes with errors

Timelane allows you to choose the lanes that it logs to. So in this case, it would make sense to only log subscription information for the last lane operator in the chain which is Decoding data. To do this, you can use the filter argument for lane:

URLSession.shared.dataTaskPublisher(for: URL(string: "https://donnywals.com")!)
  .lane("Fetching data", filter: [.event])
  .map(\.data)
  .lane("Mapping response", filter: [.event])
  .decode(type: SomeModel.self, decoder: JSONDecoder())
  .lane("Decoding data")
  .sink(receiveCompletion: { _ in }, receiveValue: { value in
    print(value)
  })
  .store(in: &cancellables)

By passing filter: [.event] to lane, you will only see events, or values, in Instruments and the subscription lane will online show the last lane from the code because that lane isn't filtered. By doing this you can limit the number of timelines that are shown in the subscription lane while still seeing all values that pass through your publisher chain.

Screenshot of a single subscription lane with multiple event lanes

Visualizing events only is especially useful for publishers that never complete (or fail) like NotificationCenter.Publisher or maybe a CurrentValueSubject that you're using to send an infinite stream of custom values through your application.

If you're using @Published properties in your app and you want to easily track them in Timeline, you can use the @PublishedOnLane property wrapper where you would normally use @Published. The @PublishedOnLane property wrapper uses an @Published property wrapper internally and overrides projectedValue to return a publisher that has a lane operator applied to it. In other words, you get all the behavior you'd expect from an @Published property with the logging superpowers from Timelane. Here's what it looks like when you use @PublishedOnLane in your code:

@PublishedOnLane("A property") var aProperty: String = "Default value"

If you want to use this property wrapper without having its subscriptions show up in the subscriptions lane, you can apply a filter as follows:

@PublishedOnLane("A property", filter: [.event]) var aProperty: String = "Default value"

The result of applying this filter is exactly the same as it is when you use the lane operator.

Caution:
The filter option for @PublishedOnLane was merged the day before I published this post so there's a chance that it's not yet available by the time you get to experiment with this post. Keep an eye on Timeline updates and make sure to try it again once a new version is released.

Examining values in Timelane

So far, I have mostly focussed on showing you how Timelane visualizes a publisher's lifecycle. Going from created to being canceled, erroring and completing. I haven't shown you that Timelane also provides insight into a publisher's output. Consider a publisher that updates every time a user types a character. This publisher is debounced to make sure we don't process values while the user is still typing:

usernameField.$value
  .lane("Username pre-debounce", filter: [.event])
  .debounce(for: 0.3, scheduler: DispatchQueue.main)
  .lane("Username", filter: [.event])
  .sink(receiveValue: { value in
    // handle value
  })
  .store(in: &cancellables)

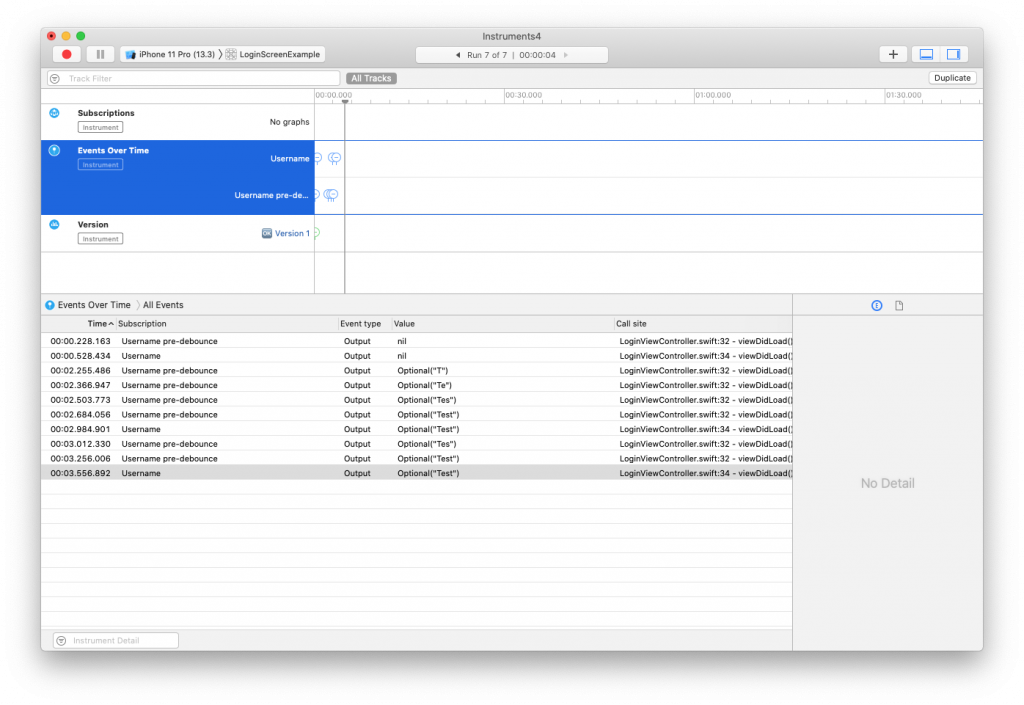
By applying a lane before, and after the debounce it's possible to see exactly what I've typed, and what was sent to the sink. Examine the following screenshot:

An example of a debounced publisher with a duplicate value

By clicking the events lane, the bottom panel in Instruments shows an overview of all events that were logged per lane. Note that the string Test got delivered to the sink twice. The reason is that I hit backspace after typing but immediately typed another t. This means that we're processing the same output twice which could be wasteful. By applying the removeDuplicates operator after debounce, we can fix this:

usernameField.$value
  .lane("Username pre-debounce", filter: [.event])
  .debounce(for: 0.3, scheduler: DispatchQueue.main)
  .removeDuplicates()
  .lane("Username", filter: [.event])
  .sink(receiveValue: { value in
    // handle value
  })
  .store(in: &cancellables)

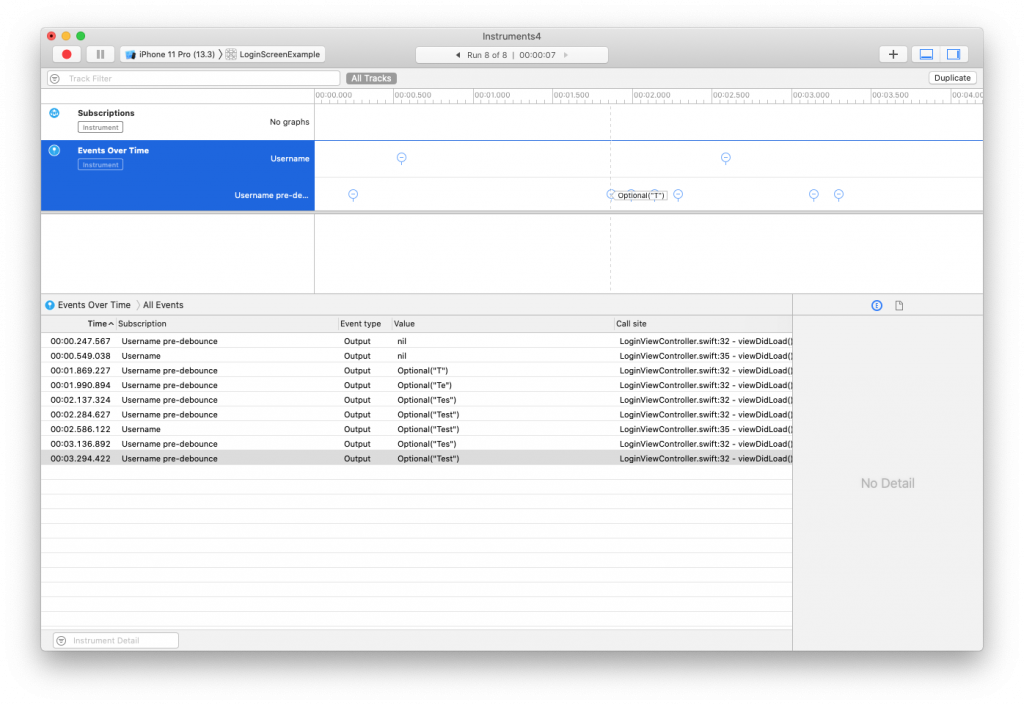
And if you look at the events view in Instruments again, you can see that the duplicate value is now gone:

An example of a publisher that uses removeDuplicates to prevent duplicate outputs

The ability to examine individual values through Instruments and Timelane is extremely useful to identify and fix problems or potential issues that you might not have discovered otherwise.

Note that the output in Instruments looks like this Optional("Test"). The output would look much nicer if we printed Test instead. You can achieve this by passing a transformValue closure to the lane operator. This closure is passed the value that Timelane will log to Instruments and you can modify this value by returning a new value from the closure:

usernameField.$value
  .lane("Username pre-debounce", filter: [.event])
  .debounce(for: 0.3, scheduler: DispatchQueue.main)
  .removeDuplicates()
  .lane("Username", filter: [.event], transformValue: { value in
    return value ?? ""
  })
  .sink(receiveValue: { value in
    // handle value
  })
  .store(in: &cancellables)

By returning value ?? "" the logged value is no longer an optional, and Timelane will log Test instead of Optional("Test"). You can also apply more elaborate transformations to the logged value. For example, you could write the following code to print Value is: Test instead of just the received value:

usernameField.$value
  .lane("Username pre-debounce", filter: [.event])
  .debounce(for: 0.3, scheduler: DispatchQueue.main)
  .removeDuplicates()
  .lane("Username", filter: [.event], transformValue: { value in
    return "Value is: \(value ?? "")"
  })
  .sink(receiveValue: { value in
    // handle value
  })
  .store(in: &cancellables)

The ability to transform the logged value can be very helpful if you want a little bit more control over what is logged exactly or if you want to make Timelane's logged values more readable which is especially useful if you're logging more complex objects than a String. For example, you might not want to log an entire User struct but instead only return its id or name property in the transformValue closure. It's entirely up to you to decide what you want to log.

In Summary

Being able to see what's going on inside of your application's asynchronous code is an invaluable debugging tool so the fact that Marin created and open-sourced Timelane is something that I am extremely grateful for. It makes debugging and understanding Combine code so much easier, and the fact that you get all of this information through a simple operator is somewhat mind-boggling.

The tool is still very young but in my opinion, Timelane is well on its way to become a standard debugging tool for RxSwift and Combine code. If you like Timelane as much as I do, be sure to share the love and let Marin know. And if you have any questions or feedback about this post, don't hesitate to reach out on Twitter.

What is @escaping in Swift?

If you've ever written or used a function that accepts a closure as one of its arguments, it's likely that you've encountered the @escaping keyword. When a closure is marked as escaping in Swift, it means that the closure will outlive, or leave the scope that you've passed it to. Let's look at an example of a non-escaping closure:

func doSomething(using closure: () -> Void) {
  closure()
}

The closure passed to doSomething(using:) is executed immediately within the doSomething(using:) function. Because the closure is executed immediately within the scope of doSomething(using:) we know that nothing that we do inside of the closure can leak or outlive the scope of doSomething(using:). If we'd make the closure in doSomething(using:) outlive or leave the function scope, we'd get a compiler error:

func doSomething(using closure: () -> Void) {
  DispatchQueue.main.async {
    closure()
  }
}

The code above will cause a compiler error because Swift now sees that when we call doSomething(using:) the closure that's passed to this function will escape its scope. This means that we need to mark this as intentional so callers of doSomething(using:) will know that they're dealing with a closure that will outlive the scope of the function it's passed to which means that they need to take precautions like capturing self weakly. In addition to informing callers of doSomething(using:) about the escaping closure, it also tells the Swift compiler that we know the closure leaves the scope it was passed to, and that we're okay with that.

You will commonly see escaping closures for functions that perform asynchronous work and invoke the closure as a callback. For example, URLSession.dataTask(with:completionHandler:) has its completionHandler marked as @escaping because the closure passed as completion handler is executed once the request completes, which is some time after the data task is created. If you write code that takes a completion handler and uses a data task, the closure you accept has to be marked @escaping too:

func makeRequest(_ completion: @escaping (Result<(Data, URLResponse), Error>) -> Void) {
  URLSession.shared.dataTask(with: URL(string: "https://donnywals.com")!) { data, response, error in
    if let error = error {
      completion(.failure(error))
    } else if let data = data, let response = response {
      completion(.success((data, response)))
    } else {
      assertionFailure("We should either have an error or data + response.")
    }
  }
}

Tip:
I'm using Swift's Result type in this snippet. Read more about it in my post on using Result in Swift 5.

Notice that in the code above the completion closure is marked as @escaping. It has to be because I use it in the data task's completion handler. This means that the completion closure won't be executed until after makeRequest(_:) has exited its scope and the closure outlives it.

In short, @escaping is used to inform callers of a function that takes a closure that the closure might be stored or otherwise outlive the scope of the receiving function. This means that the caller must take precautions against retain cycles and memory leaks. It also tells the Swift compiler that this is intentional. If you have any questions about this tip or any other content on my blog, don't hesitate to send me a Tweet.

What are computed properties in Swift and when should you use them?

One of Swift's incredibly useful features is its ability to dynamically compute the value of a property through a computed property. While this is a super handy feature, it can also be a source of confusion for newcomers to the language. A computed property can look a bit strange if you haven't seen one before; especially when you are learning about custom get and set closures for properties at the same time.

In this week's post, I would like to take some time to explain computed properties in-depth so you can begin using them in your codebase with confidence.

By the end of this post, you will have a solid understanding of how computed properties work, how and when they are executed and how you can begin using them in your code.

Understanding how a computed property works

A computed property in Swift is a property that can't be assigned a value directly. It calculates its current value based on a closure-like block of code that you return a value from. Let's look at a very basic example of a computed property:

struct User {
  var firstName: String
  var lastName: String

  var fullName: String {
    "\(firstName) \(lastName)"
  }
}

In this example, I have defined a fullName property on a struct that concatenates two strings as a computed property. Every time I access fullName, the code between the { and } is executed to determine what the value of fullName should be:

var user = User(firstName: "Donny", lastName: "Wals")
print(user.fullName) // "Donny Wals"
user.lastName = "Secret"
print(user.fullName) // "Donny Secret"

This is incredibly useful because the user's fullName will always reflect the combination of the user's current firstName and lastName properties.

Because a computed property isn't a stored property, it's also okay to declare a computed property in an extension of an object:

struct User {
  var firstName: String
  var lastName: String
}

extension User {
  var fullName: String {
    "\(firstName) \(lastName)"
  }
}

A computed property in Swift is a get-only property because it does not have any storage that you can assign a value to. This means that the following code where we attempt to assign a value to one of our computed properties is not valid Swift:

var user = User(firstName: "Donny", lastName: "Wals")
user.fullName = "New Name" //  Cannot assign to property: 'fullName' is a get-only property

In my example, I was able to write my computed property in a single statement so I omitted the return keyword. A computed property essentially follows the same rules as functions and closures do, so you can also have multiple lines in a computed property:

extension User {
  var fullName: String {
    if firstName.isEmpty {
      return "<unkown> \(lastName)"
    } else if lastName.isEmpty {
      return "\(firstName) <unkown>"
    } else {
      return "\(firstName) \(lastName)"
    }
  }
}

When you write a computed property, you can write it with two different notations. One is the notation I have been using so far. The other is a slightly more specific version:

extension User {
  var fullName: String {
    get {
      "\(firstName) \(lastName)"
    }
  }
}

In this notation, you explicitly define the getter for fullName. It's not common to write your property like this if you don't also specify the setter for a property.

If your implementing conformance to a protocol, a computed property can be used to satisfy a protocol requirement that uses a get property:

protocol NamedObject {
  var firstName: String { get set }
  var lastName: String { get set }
  var fullName: String { get }
}

extension User: NamedObject {}

The User object I've shown at the start of this post satisfies all requirements from the NamedObject protocol. Because fullName is a get property, you can use a constant (let) to satisfy this requirement, but a computed property would work as well and be more fitting in this case. In fact, because we can declare computed properties on extensions, it's possible to provide a default implementation for fullName that's defined on NamedObject:

extension NamedObject {
  var fullName: String { "\(firstName) \(lastName)" }
}

Keep in mind that a computed property is evaluated every time you access it. This means that its value is always up to date, and computed based on the current state of the program. So in the case of fullName, its value will always be based on the current values of firstName and lastName, no matter what.

While this is convenient in many cases, it can also get you in trouble if you're not careful. Let's go over some best practices to help you make sure that your computed property usage is appropriate and efficient.

Best practices when using computed properties

Knowing when you might want to use a computed property is key if you want to use them efficiently. In the previous section, I've shown you how computed properties work. A keen eye may have noticed that a computed property acts a lot like a function that takes no argument and returns a single value:

extension User {
  var fullName: String {
    "\(firstName) \(lastName)"
  }

  func fullName() -> String {
    "\(firstName) \(lastName)"
  }
}

I have found that a good rule of thumb for computed properties and this kind of function is to try and decide what the function does. If your function takes no arguments and only reads some values from its current environment without any side-effects, you're looking at a good candidate for a computed property. The lack of side-effects is absolutely crucial here. Accessing a property should not produce any side-effects. A side-effect, in this case, could be changing a property, kicking off a network call, reading from a database or really anything more than just passively reading the current state of the program.

Because a computed property is recomputed every time it's accessed it's important that you make sure your implementation of a computed property is efficient. If the code needed to compute a value is complex and potentially slow, consider moving this code into a function with a completion closure and performing the work asynchronously. Performing work asynchronously is something you cannot do in a computed property.

Another important consideration to take into account related to the property being recomputed for every access is to make sure you don't confuse a computed property with a lazy property that is initialized with a closure:

extension User {
  var fullName: String {
    "\(firstName) \(lastName)"
  }

  lazy var expensiveProperty: String = {
    // expensive work
    return resultOfExpensiveWork
  }()
}

The expensiveProperty in this example is initialized using the closure expression I assigned to it. It's also lazy which means it won't be evaluated until expensiveProperty is accessed for the first time. This is very different from how a computed property works. The lazy property is only evaluated and initialized once. Subsequent access of the lazy property won't re-execute the expensive work. It's important to understand this difference because performing expensive or redundant work in a computed property can cause serious performance problems that can be very frustrating to track down.

In summary

In this post, I explained how computed properties work in Swift, and how you can use them effectively. I explained how you can declare computed properties in your codebase, and I've shown you that you can use computed properties to satisfy protocol requirements.

I moved on to explain some best practices surrounded computed properties and I've shown you that you can sometimes replace simple functions with computed properties to make your code easier to read. I also showed you the difference between a lazy property and a computed property, and I explained that it's important to understand the differences between the two to avoid potential performance issues.

If you have any questions or feedback about this post, don't hesitate to send me a Tweet.