Enforcing code consistency with SwiftLint
If you're ever amongst a group of developers and want to spark some intense discussion, all you need to do is call out that tabs are better than spaces. Or that indenting code with two spaces is much better than four. Or that the curly bracket after a function definition goes on the next line rather than on the same line as the method name.
A lot of us tend to get extremely passionate about our preferred coding styles and we're not afraid to discuss it in-depth. Which is fine, but this is not the kind of discussion you and your team should have for every PR that's made against your git repository. And you also don't want to explain and defend your coding style choices every time you have a new team member joins your team.
Luckily, developers don't just love arguing about their favorite code style. They also tend to get some joy out of building tools that solve tedious and repetitive problems. Enforcing a coding style is most certainly one of those tedious problems and for every sufficiently tedious problem, there is a tool to help you deal with that problem.
In this week's post, I would like to introduce you to a tool called SwiftLint. SwiftLint is used by developers all over the world to help them detect problems in how they style their code and to fix them. I will show you how you can add SwiftLint to your projects, configure it so it conforms to your wishes and how you can use it to automatically correct the problems it has found so you don't have to do this manually.
Adding SwiftLint to your project
Before you can use SwiftLint in your project, you need to install this. If you have Homebrew installed, you can install SwiftLint using the following command:
brew install swiftlint
Running this command will pull down and install the SwiftLint tool for you.
Once SwiftLint is installed, you can immediately begin using it by running the swiftlint command in your project folder from the Terminal.
Alternatively, you can add Swiftlint to your project using Cocoapods by adding the following line to your Podfile:
pod 'SwiftLint'
Using Cocoapods to install SwiftLint allows you to use different versions of SwiftLint for your projects and you can pinpoint specific releases instead of always using the latest release like Homebrew does.
After installing Swiftlint through Cocoapods, you can navigate to your project folder in terminal and run Pods/SwiftLint/swiftlint command to analyze your project with the SwiftLint version that was installed through Cocoapods.
Running Swiftlint with its default settings on a fresh project yields the following output:
❯ swiftlint
Linting Swift files at paths
Linting 'ViewController.swift' (1/3)
Linting 'AppDelegate.swift' (2/3)
Linting 'SceneDelegate.swift' (3/3)
/Users/dwals/Personal/SwiftLintDemo/SwiftLintDemo/ViewController.swift:20:1: warning: Trailing Newline Violation: Files should have a single trailing newline. (trailing_newline)
/Users/dwals/Personal/SwiftLintDemo/SwiftLintDemo/ViewController.swift:18:1: warning: Vertical Whitespace Violation: Limit vertical whitespace to a single empty line. Currently 2. (vertical_whitespace)
/Users/dwals/Personal/SwiftLintDemo/SwiftLintDemo/SceneDelegate.swift:16:1: warning: Line Length Violation: Line should be 120 characters or less: currently 125 characters (line_length)
/Users/dwals/Personal/SwiftLintDemo/SwiftLintDemo/SceneDelegate.swift:19:1: warning: Line Length Violation: Line should be 120 characters or less: currently 143 characters (line_length)
/Users/dwals/Personal/SwiftLintDemo/SwiftLintDemo/SceneDelegate.swift:27:1: warning: Line Length Violation: Line should be 120 characters or less: currently 137 characters (line_length)
/Users/dwals/Personal/SwiftLintDemo/SwiftLintDemo/SceneDelegate.swift:53:1: warning: Trailing Newline Violation: Files should have a single trailing newline. (trailing_newline)
/Users/dwals/Personal/SwiftLintDemo/SwiftLintDemo/SceneDelegate.swift:20:15: warning: Unused Optional Binding Violation: Prefer `!= nil` over `let _ =` (unused_optional_binding)
/Users/dwals/Personal/SwiftLintDemo/SwiftLintDemo/SceneDelegate.swift:15:1: warning: Vertical Whitespace Violation: Limit vertical whitespace to a single empty line. Currently 2. (vertical_whitespace)
/Users/dwals/Personal/SwiftLintDemo/SwiftLintDemo/SceneDelegate.swift:51:1: warning: Vertical Whitespace Violation: Limit vertical whitespace to a single empty line. Currently 2. (vertical_whitespace)
/Users/dwals/Personal/SwiftLintDemo/SwiftLintDemo/AppDelegate.swift:16:1: warning: Line Length Violation: Line should be 120 characters or less: currently 143 characters (line_length)
/Users/dwals/Personal/SwiftLintDemo/SwiftLintDemo/AppDelegate.swift:23:1: warning: Line Length Violation: Line should be 120 characters or less: currently 177 characters (line_length)
/Users/dwals/Personal/SwiftLintDemo/SwiftLintDemo/AppDelegate.swift:31:1: warning: Line Length Violation: Line should be 120 characters or less: currently 153 characters (line_length)
/Users/dwals/Personal/SwiftLintDemo/SwiftLintDemo/AppDelegate.swift:37:1: warning: Trailing Newline Violation: Files should have a single trailing newline. (trailing_newline)
/Users/dwals/Personal/SwiftLintDemo/SwiftLintDemo/AppDelegate.swift:15:1: warning: Vertical Whitespace Violation: Limit vertical whitespace to a single empty line. Currently 3. (vertical_whitespace)
/Users/dwals/Personal/SwiftLintDemo/SwiftLintDemo/AppDelegate.swift:35:1: warning: Vertical Whitespace Violation: Limit vertical whitespace to a single empty line. Currently 2. (vertical_whitespace)
Done linting! Found 15 violations, 0 serious in 3 files.
While it's nice that we can run SwiftLint on the command line, it's much nicer if SwiftLint's output was shown directly in Xcode, and if SwiftLint would run automatically for every build action. You can achieve this by adding a new Run Script Phase to your project's Build Phases tab:
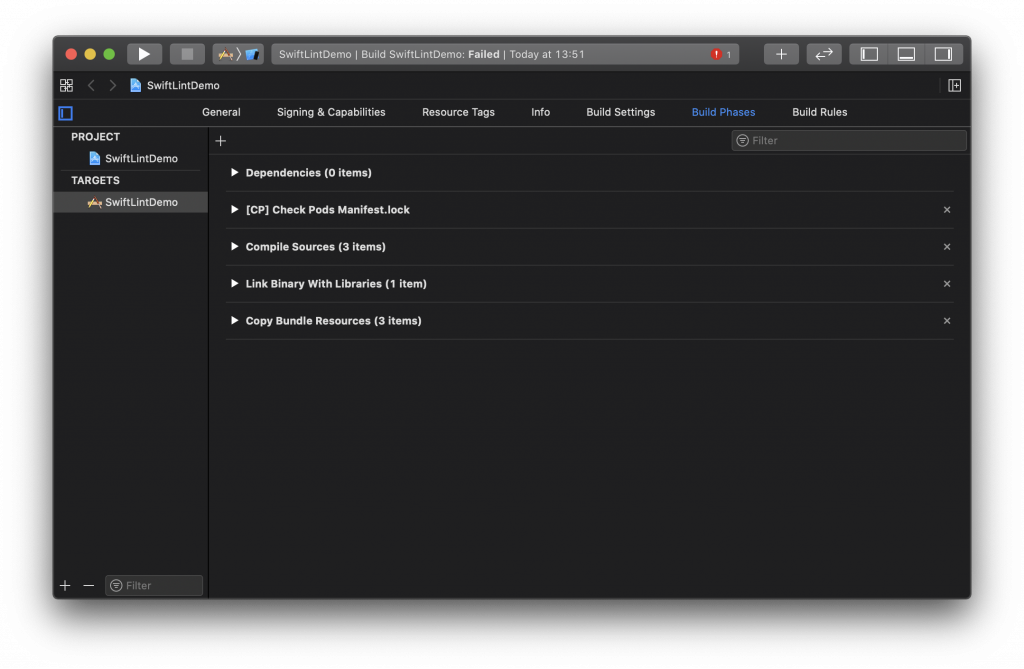
Click the + icon and select New Run Script Phase:

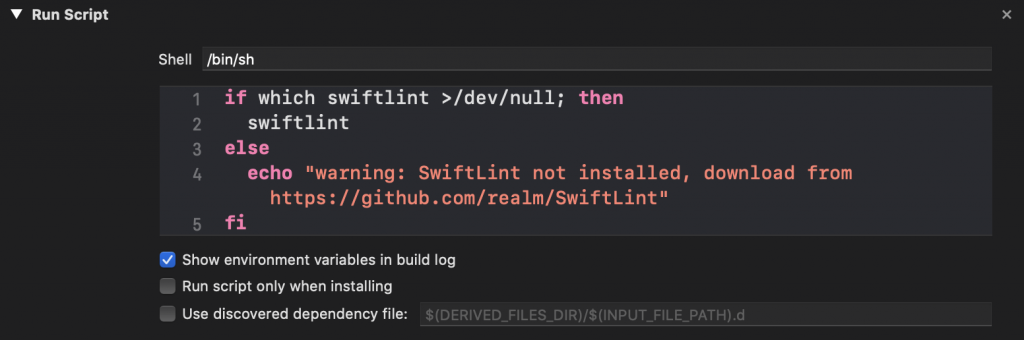
Open the newly added Run Script step and add the following code to it:
if which swiftlint >/dev/null; then
  swiftlint
else
  echo "warning: SwiftLint not installed, download from https://github.com/realm/SwiftLint"
fi
Your step should look like this in Xcode:
If you're running SwiftLint with CocoaPods, your Run Script Phase should look as follows:
"${PODS_ROOT}/SwiftLint/swiftlint"
The earlier version of the Run Script Phase would execute the globally installed SwiftLint version rather than the one that's installed by Cocoapods.
After setting up your build phase, Xcode will run Swiftlint after every build and show you inline warnings and errors where appropriate. This is much more convenient than using the terminal to run Swiftlint and figuring out what errors go where.
Setting up custom SwiftLint rules
SwiftLint can do some really good work to help you write better code, and it's quite smart about it too. For example, SwiftLint will urge you to use array.isEmpty over array.count == 0. It will also prefer that you use myVar != nil over let _ = myVar and more. For a complete list of SwiftLint's rules, you can look at this page. There are a ton of rules so I won't cover them in this post. It's just too much.
Every rule in the rule directory comes with a comprehensive page that explains what the rule does, and whether it's enforced in the default configuration. One rule that I kind of dislike is the Line Length rule. I use a marker in Xcode that suggests a certain line length but I don't want SwiftLint to enforce this rule. Based on the directory page for this rule, you can find out that it's enabled by default, that it warns you for a line length of 120 characters or longers and that it throws an error for 200 characters or more. Additionally, this rule applies to urls, comments, function declarations and any other code you write.
You can disable or customize this rule in a .swiftlint.yml file (note the . in front of the filename). Even though I dislike the line length rule, other members of my team might really like it. After thorough discussions, we might decide that this rule should not apply to URLs and comments, it should warn at 140 characters and it should throw an error at 240 characters.
To set this up, you need to add a .swiftlint.yml file to your project directory. Note that this file should be added alongside your Xcode project and your Xcode workspace. It should not be placed inside of your project files directory. SwiftLint expects your .swiftlint.yml file to exist in the same directory that you'll run SwiftLint from which, in this case, is the folder that contains your Xcode project.
To set up the line length rule to behave as I mentioned, add the following contents to .swiftlint.yml:
line_length:
  warning: 140
  error: 240
  ignores_comments: true
  ignores_urls: true
To configure a specific rule, you create a new yaml node with the rule name. Inside of that node you can add the configuration for that specific rule. It's also possible to provide lists of enabled and disabled rules in your .swiftlint.yml file:
disabled_rules:
  unused_optional_binding

opt_in_rules:
  empty_count
Each enabled or disabled rule should be listed on a new line under its respective node. You can find the identifiers for all SwiftLint rules in the rules directory.
If you don't want to run SwiftLint on all of your source files, you can specify a list of excluded folders or files in .swiftlint.yml as follows:
excluded:
  Pods
  Carthage
You can use patterns like Sources/*/MyFiles.swift to match wildcards if needed.
For a complete list of possible yaml configuration keys, refer to the SwiftLint repository.
Sometimes you don't want to opt-out of a rule completely but you want to make an exception. If this is the case, you can specify this for a complete file, for a line, or a block of code. A full overview with examples is available in the SwiftLint repository but I'll include a brief overview here.
The following code disables the line length rule from the moment this comment is found, until the end of the file or until the rule is explicitly enabled again. You can specify multiple rules separated by a space.
// swiftlint:disable line_length
If you want to (re-)enable a specific SwiftLint rule you can write the following comment in your code:
// swiftlint:enable line_length
You can also use comments to enable the next, previous or current violation of a SwiftLint rule. I took the following example from the SwiftLint repository:
// swiftlint:disable:next force_cast
let noWarning = NSNumber() as! Int
let hasWarning = NSNumber() as! Int
let noWarning2 = NSNumber() as! Int // swiftlint:disable:this force_cast
let noWarning3 = NSNumber() as! Int
// swiftlint:disable:previous force_cast
Determining which SwiftLint rules you should apply to your codebase is a highly personal decision that you should consider carefully with your team.
If your project runs on CI, SwiftLint will automatically run when your CI builds your project so there's no additional work for you there. If you want to run SwiftLint only on CI, you can remove the Run Script Phase from your Xcode project and run SwiftLint directly using the steps mentioned at the start of this section.
Using SwiftLint to fix your code automatically
Some of SwiftLint's rules support automated corrections. You can execute SwiftLint's automated corrections using the following command:
swiftlint autocorrect
If you're using SwiftLint through Cocoapods you'll want to use the following command instead:
Pods/SwiftLint/swiftlint autocorrect
This command will immediately make changes to your source files without asking for permission. I highly recommend you to commit any uncommitted changes in your projects to git before running autocorrect. This will allow you to see exactly what SwiftLint change, and you will be able to undo any undesired actions easily.
In Summary
This week, you learned about SwiftLint and how you can add it to your projects to automatically ensure that everybody on your team sticks to the same coding style. A tool like SwiftLint removes discussions and bias from your workflow because SwiftLint tells you when your code does not meet your team's standards. This means that you spend less time pointing out styling mistakes in your PRs, and you don't have to sit down with every new team member to explain (and defend) every stylistic choice you made in your codebase. Instead, everybody can look at the SwiftLint file and understand what decision the team has made.
I showed you how you can set up your .swiftlint.yml configuration file, and how you can apply specific exceptions in your code where needed. Keep in mind that you should not find yourself adding these kinds of exceptions to your code regularly. If this is the case, you should probably add a new rule to your SwiftLint configuration, or remove an existing rule from it.
Lastly, you learned about the autocorrect command that will automatically fix any SwiftLint warnings and errors where possible.
If you have any questions or feedback for me don't hesitate to send me a Tweet.