Sequencing tasks with DispatchGroup
When you're building apps, there are times when you need to perform certain tasks before executing the next task. Imagine a scenario where you need to make a couple of API calls to a webserver to retrieve information before you can begin processing the information that's fetched by all preceding API calls, so it can be used in your app. Usually, you want to perform this work as efficiently as possible. In the example I just outlined, this might mean that you want to fire off your API calls to retrieve information all at once, and begin processing immediately when all calls have finished.
In today's article, I will show you how to do this using a GCD (Grand Central Dispatch) feature called Dispatch Groups. I will first explain what we're going to build, and then I will show you how to achieve complete the task using the DispatchGroup class.
Understanding the problem that a Dispatch Group solves
In this article, I will show you how to build an advanced system that collects information from a couple of resources before it stitches that information together so it can be used by another operation. Examine the following graph of operations:
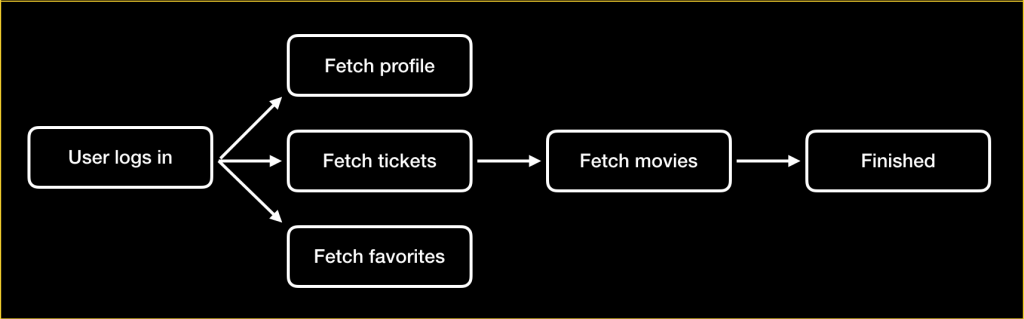
The diagram above is a simplified version of a flow that I once had to build. A lot of complex caching was involved in the original problem but for the purposes of this article I distilled it down to a handful of tasks. When a user logs in, certain information is retrieved. To limit the number of calls made to the movie webserver, we first collect all the required information about the user. The user profile contains a reference to the user's all-time favorite movie. Every ticket that belongs to the user also has a reference to the movie that the ticket is for. The user's favorites are, you guessed it, also references to movies. So once we have all the references to movies, we can bundle them together and get all movie data in one API call rather than three.
To achieve this without Dispatch Groups you could wrap each individual operation in an object, and when one task object finishes you can check the status of all task objects to see if all tasks are now finished. If they are, you can trigger the next operation. This might work for a while, but it takes a lot of manual bookkeeping and race conditions between operations might make it seem like not all operations have finished while in reality, they finished at pretty much the exact same moment.
Dispatch Groups solve exactly this problem. With a Dispatch Group, you remove the burden of wrapping and monitoring every task you want to execute. Instead, you register enter and leave events on the Dispatch Group. You also tell the Dispatch Group what to do when all enter invocations have had a matching leave invocation. The idea is simple enough, right? Create a group, register a bunch of enter events, leave when a task completes and the group will automatically do what you need it to do when all work is done. Amazingly, that is exactly how DispatchGroup works!
Note:
If you've done work with operations and operation queues where operations depend on each other, you might be wondering why I didn't mention them in this section. You might even prefer them for problems similar to the one I highlighted. Operation queues with operations and dependencies are indeed a fantastic way to solve problems like these. However, they are more complex than using Dispatch Queues directly and also require a bit more work to get going.
Let's see how you would implement the tasks outlined in the diagram from the beginning of this section, shall we?
Using a Dispatch Group
To use a Dispatch Group, the first thing you need to do is create one. So let's define a function that we'll expand until it's a complete step in our syncing process:
func collectMovieIds() {
  let group = DispatchGroup()
  var movieIds = Set<Int>()

  // we'll write the implementation of this function here
}
This function declares two local variables. One for the Dispatch Group, and one for the movie ids we collect along the way. When all movie ids are collected, we need to kick off the next operation. Let's update the function so it does that as soon as the Dispatch Group has executed all of its tasks:
func collectMovieIds() {
  let group = DispatchGroup()
  var movieIds = Set<Int>()

  // All code snippets after this one go in this area

  group.notify(queue: DispatchQueue.global()) {
    self.handleMovieIds(movieIds)
  }
}
To specify what the Dispatch Group does after all its tasks are completed, you call the notify(queue:work:) method on the Dispatch Group. The queue argument is an important one because it specifies where the closure that's passed as the work argument is executed. If you want to update the UI when all tasks are done, you could pass DispatchQueue.main. If you want to kick off the next API call as we do here, DispatchQueue.global() is probably more appropriate. If you to learn more about Dispatch Queues and when you need to use the main queue, you can read my post called "Appropriately using DispatchQueue.main".
For convenience, we're going to assume that a UserService object is available to our function and that it can perform all API calls we need. The following snippet would go in between the movieIds set and the call to notfify(group:work:):
group.enter()
userService.fetchProfile { profile in
  movieIds.insert(profile.allTimeFavorite)
  group.leave()
}

group.enter()
userService.fetchFavorites { favorites in
  for favorite in favorites {
    movieIds.insert(favorite.movie)
  }
  group.leave()
}

group.enter()
userService.fetchTickets { tickets in
  for ticket in tickets {
    movieIds.insert(ticket.movie)
  }
  group.leave()
}
Note how every operation enters the group right before it starts its task, and it leaves the group when each completion closure is called. The Dispatch Group will keep track of all calls to enter() and leave(), and it will call the closure that you passed to notify(queue:work:) once all calls to enter() have a corresponding leave() call.
You don't have to keep the group inside of a function as I did here. You're free to abstract each operation into a different object and pass the queue around. For example, you could refactor the function we wrote in this section to look a little bit like this:
func collectMovieIds() {
  let group = DispatchGroup()
  var movieIds = Set<Int>()

  userService.fetchProfile(group: group) { profile in
    movieIds.insert(profile.allTimeFavorite)
  }

  userService.fetchFavorites(group: group) { favorites in
    for favorite in favorites {
      movieIds.insert(favorite.movie)
    }
  }

  userService.fetchTickets(group: group) { tickets in
    for ticket in tickets {
      movieIds.insert(ticket.movie)
    }
  }

  group.notify(queue: DispatchQueue.global()) {
    print("Completed work: \(movieIds)")
    // Kick off the movies API calls
    PlaygroundPage.current.finishExecution()
  }
}
In this example, it's the job of the UserService to call enter() and leave() on the group when needed. As long as that's done correctly you can pass your group around as much as you want.
If you were expecting to see or write a lot more code, I'm sorry. There isn't anything more to DispatchGroup that you need to know in order to implement a flow similar to the one I showed you in the diagram from the previous section.
In summary
When you need to implement processes in your app that run asynchronously, and you need to wait on all of them to complete before doing the next thing, Dispatch Groups are a tool worth exploring. With its relatively simple API, DispatchGroup packs quite a punch. It provides powerful mechanisms to orchestrate and manage complicated processes in your app. When used wisely and correctly, it can really help you clean up your code.
The most important things to remember about using DispatchGroup in your code is that every enter() call needs to have a corresponding call to leave(), and you need to call notify(queue:work:) to tell the DispatchQueue what to do when all of its work is completed.
If you have any questions about Dispatch Groups, have feedback or anything else, don't hesitate to reach out on Twitter.