Getting ready to publish your app on the App Store
Published on: December 24, 2019You've done all the work to build your app, your UI looks amazing, animations are smooth and you're ready to put your app in the hands of other people. Maybe you're even ready to start offering your app on the App Store! This is a huge achievement if you are currently at this stage in your development cycle, I would like to congratulate you. Being ready to ship your app is a huge accomplishment, especially if it's your first App. I still remember the excitement when I submitted my first app to the App Review team in App Store Connect (when it was still called iTunes Connect). And I was even more excited when the app got approved and I could tell my friends to search for it in the App Store, and they would find it and download it. That truly was a magical moment for me.
Today, I would like to share some tips that will help you get ready for a smooth launch of your app. I am by no means a marketing expert, so I won't give you advice on how you can promote or market your app. Instead, I will provide you with a list of things you'll need to do from the moment you decide you're ready to push your app up to App Store Connect and submit it to the App Store. By the end of this post, you will know how to create your app in App Store Connect, how to submit your app for beta testing and even how to submit your app for App Store review.
The list below is presented in an order that I find comfortable, but of course, you're free to follow the steps in any order that fits your workflow.
Review the guidelines
Ideally, you execute this step early in the development process of your app. If you're not familiar with Apple's App Store Review Guidelines, you can find them here. This document contains loads of information that you need to know to make sure your app is appropriate for the App Store. For example, the guidelines state that your app must contain functionality that makes it interesting or more than just a website packaged in an app. Unfortunately, reviewing the guidelines is not a guarantee that your app will be accepted in the App Store. The review process is conducted by humans that might interpret the guidelines slightly different than you did. Regardless of this fact, it's still a good idea to familiarize yourself with the guidelines because it prevents a lot of disappointment down the line.
Create your app in App Store Connect
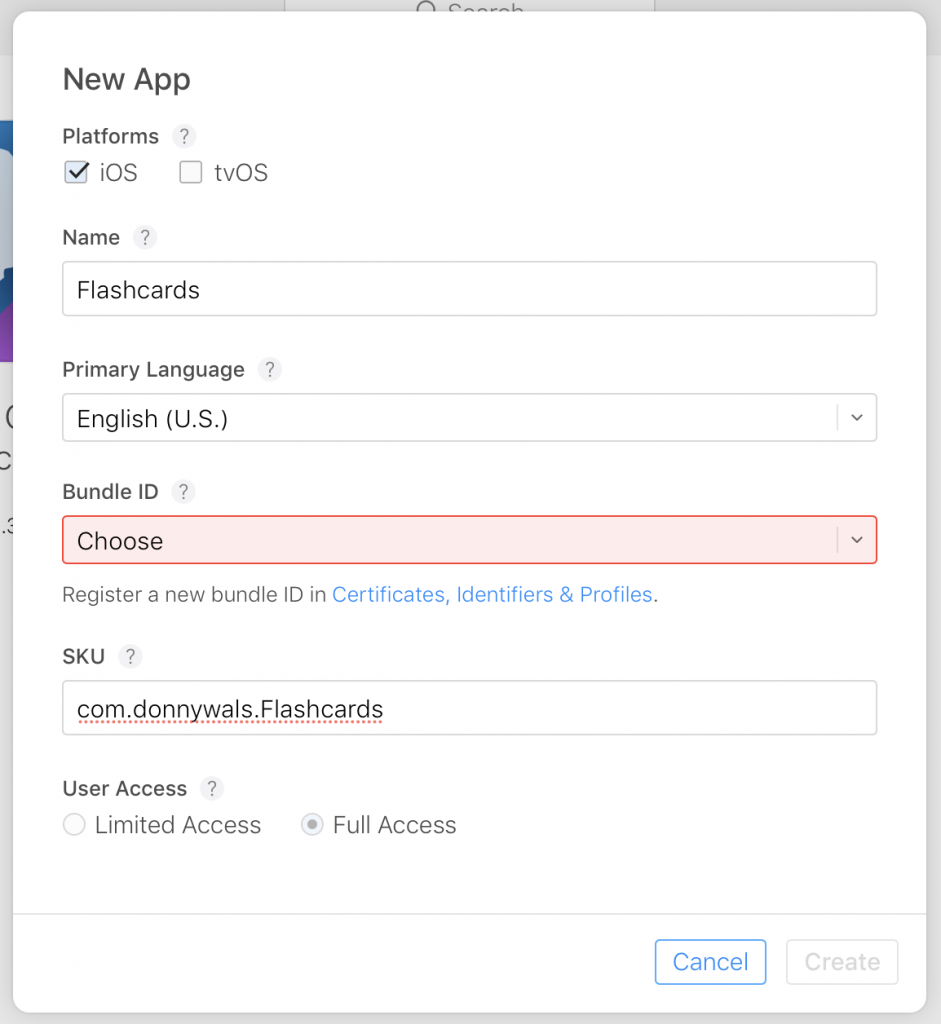
Before you can submit your app to the store, you must register it on Apple's App Store Connect platform. App Store Connect is the central place where you manage your entire app's store presence. To register your app, log in and on your dashboard click the My Apps icon. Next, click the + icon in the top left corner of the screen to add a new app. Fill out the form that pops up:

Your app's bundle identifier might not be present in the list of bundle ids that are presented in the drop-down menu for the Bundle id field. If this is the case, click the Certificates, Identifiers & Profiles link that is shown below the drop-down and fill out your app's information to register your bundle id in the developer portal:

Once you've registered your app, you are taken to your app's management portal. Here you can manage your app's App Store information, pricing and the builds that you're running in Testflight or submit a new build for review.
Note that you can localize the information that's shown under the Localizable Information header using the drop-down menu on the right side of the window. When you registered your app, version 1.0 was created for your app in the sidebar on the left. This is where you can add screenshots, videos and release notes for your app's version. This is also where you select the build of your app that you want to submit to the App Store. But before you can do this, you need to archive your app in Xcode and upload it to App Store Connect.
Archive your App in Xcode and upload it to App Store Connect
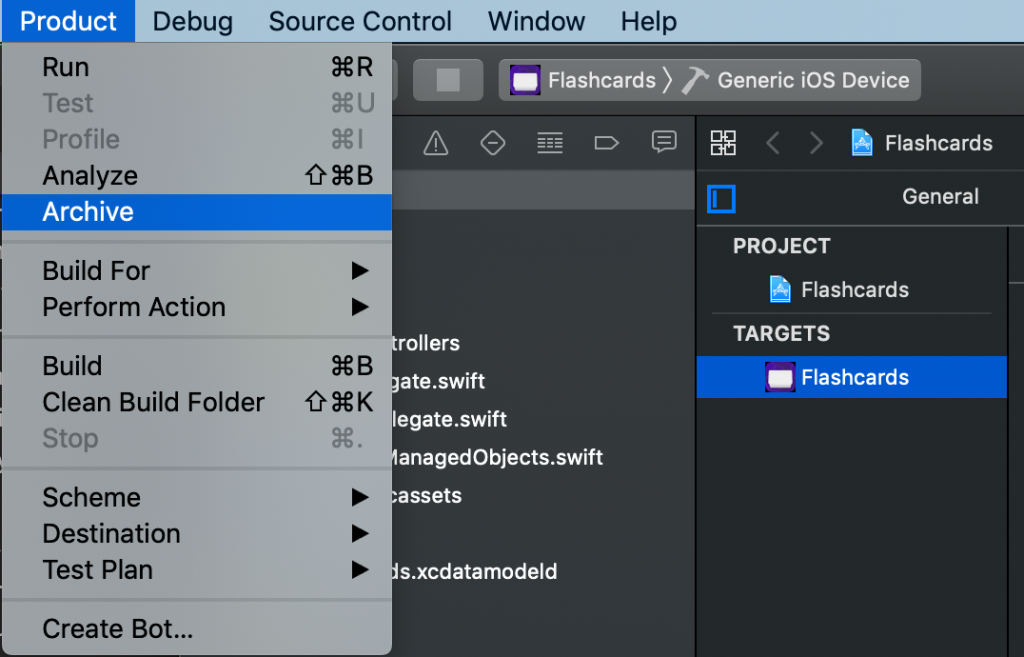
Once your app is ready to be deployed to App Store Connect, you need to archive it. To do this, select the Generic iOS Device as the target to build your app to, and select the Product -> Archive option from the Xcode menu bar:

Archiving your app might take a little while because Xcode will build your app using your Release configuration, and using settings that will allow your app to run on all iOS devices. When Xcode is done archiving your app, the Organizer window will open. From there you can select the archive that Xcode just created for you, and you can upload it to App Store Connect using the Distribute App option. Typically, you can keep al default options and click Next for every step. Once you've gone through all the steps, Xcode will upload your app to App Store Connect where your binary will be processed. This might take a while and you should receive an email from Apple when your binary has completed processing.
Deploy your app to TestFlight
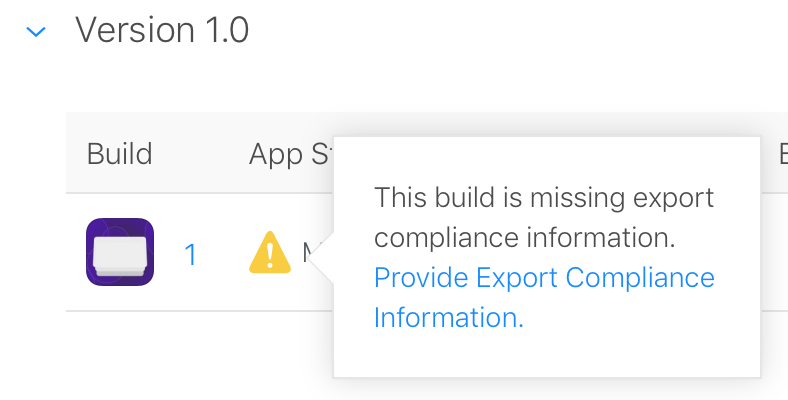
Once your build has processed, you need to prepare it for Testflight. Fill out all the required information under the Test Information section on the Testflight page for your app. You also need to provide "compliance information". Click on the warning sign that should be visible on your processed build and provide the requested information. Once you've done this you can immediately send your Testflight app to your App Store Connect team members using the App Store Connect Users section in the sidebar.
To send your app to external testers, go to the Add External Testers page in the sidebar. You will first be asked to create a group for your testers. Provide a name and continue. Next, go to the Builds section on the external testers page and add the build that you just uploaded.

Follow the steps in the pop up that appears after you've clicked the Add build to start testing button. Make sure to fill out the Test Information page with the key parts of your app that you want your testers to pay attention to. After doing this, click Submit for Review. This will send your app to Apple for a very brief beta-phase review. Getting approved for Testflight does not guarantee that your app will be approved for the App Store. In the meantime, you can begin adding testers using the Testers section. Once your build has been approved by Apple, a public link will be visible on the Testers page that you can share to allow people to obtain access to your Testflight app.
Create a video of your app's key features
The App Store allows you to include a video that promotes your app on your App Store page. While this is not required, it's certainly recommended. Your promo video should be short, to the point, and it should make people want to use your app. It's important to ensure that your video doesn't rely too much on Audio because not everybody that uses the App Store will be in a position to listen to your promo video's audio. Again, a promo video is not required but it's most certainly recommended.
Create screenshots for your app
While a promotional video is optional, screenshots are required. When supplying screenshots for iPhone, you need to upload screenshots for, at least, the 6.5" Display form factor and the 5.5" Display form factor. This boils down to the largest phones with, and without a home button. Smaller form factors will use the larger screenshots on the App Store page. Of course, you're free to upload screenshots for every display size individually if you want to. For iPad, you need to include screenshots for the 12.9" 2nd- and 3rd generation iPad pros. Again, this boils down to devices with and without a home button. The larger form factor screenshots will be used for the smaller displays on the iPad in the same way this is done for the iPhone.
It's possible to localize your screenshots similar to how you can localize your app's information on the App Information page.
When you need to take screenshots for several devices, using many different localizations, I can recommend that you look into using Fastlane. Fastlane includes a tool called Snapshot that allows you to automate the process of taking screenshots using UI Tests which is really convenient. I won't go into detail about setting this up since that topic should be an entire post of its own.
Prepare your app's metadata in App Store Connect
Once you're happy with the results of your Testflight beta, everything is prepared and uploaded and you're feeling confident to send your app to the review team you should give your app's metadata one last look. Make sure your app name is correct, add a privacy URL and a catchy subtitle and pick the primary and secondary category that your app should be listed in. Additionally, on the version-specific page, make sure that you include a nice promo test and an accurate description of your app. For your keywords, it's important to try and use as many relevant keywords as possible. Don't include your app name in the keywords because your app will already be indexed using your app name.
Also, make sure to select the correct build under the Build section, include a nice App Store icon (this should be your app icon exported at 1024x1024 pixels) and add any other relevant information.
Once everything is set, it's time to take the final step; Submitting to the App Store
Submit your app for review
When you submit your app for review, you can still change some of your app's metadata but keep in mind that a lot of the information about your app cannot change anymore. Also, make sure to check the appropriate way to release your app.

If everything is in a good place, and your happy with your app, your App Store description and other metadata and you've selected an appropriate way for your app to be rolled out to users once it's approved, click the big Submit for Review button on your app's version page.
Rejoice!
After submitting your app, the waiting game begins. Apple will typically review your app within a couple of days but it might also take a few hours or a week. The key is patience. If your app has been in review for over a week, it might help to re-submit your app. But often, waiting a bit longer is the better strategy. If Apple rejects your app, the rejection notice will typically include a little bit of information about the reason. Often they will include the App Store guideline that they consider you to break, and you should correct this. If you don't agree with the verdict, you can always appeal or request a call with Apple. Keep in mind that Apple is not your enemy here, they will happily work with developers to help them make the required adjustments and get you in the store. Their main priority is to make sure everything that's published in the Store is up to their standards. Unfortunately, this is a process performed by humans and some reviewers appear to be more strict with certain guidelines than others. There's nothing you can do about that other than trying to work with your reviewer to resolve any issues.
Once your app is approved, it's time to celebrate! Tell all your friends and most importantly, send me a Tweet! I want to see your finished projects in all their glory.

)
