Mesh Gradients in SwiftUI explained
Published on: September 25, 2024Updated on: July 7, 2025
With iOS 18, we have the possibility to create mesh gradients. Mesh gradients are a really nice way to create very cool UI effects. In this post, we're going to explore exactly what mesh gradients are, how we can use them, and how we can even animate them to look really cool.
We’ll start off looking at how we can create a mesh gradient. We're going to take a look at how it more or less works, and then we'll also look at what we can animate and how we can play with mesh gradients. At the end of the post, I'll talk a little bit about where I think it makes a lot of sense to use mesh gradients and where maybe it could be a little bit much.
Let's dig in, shall we?
Creating a mesh gradient
A mesh gradient is a gradient that doesn't just go from one color to another like a standard linear or radial gradient would. It goes through several colors in a kind of cloud formation looking way. Let's look at an example of a mesh gradient down below.
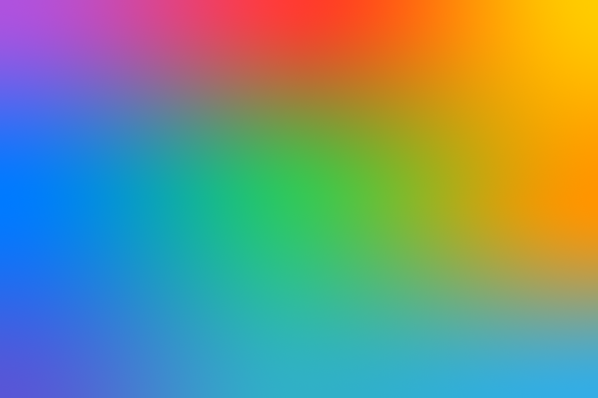
In this picture, we can see a gradient that uses nine colors to create an interesting effect where we go from that purple color in the top-left to a different color in the middle and then another color in the top-right and in the bottom-left, basically allowing us to have different colors inside of the gradient and they all mesh into each other like the name mesh gradient suggests.
We can create these gradients in SwiftUI by using the new mesh gradient object.
Anatomy of a mesh gradient
A mesh gradient needs a couple of things: a width and a height, which basically tell the mesh gradient the number of colors that we'll have on the horizontal and vertical axis.
For example, we could create mesh gradient that uses four colors instead of nine. That mesh would have a width of two and a height of two. This results in a mesh that has two rows with two columns each. We could also make it a gradient that has a width of 2 and a height of 3, which means that we're going to have two columns over three rows, so a total of six colors.
With a gradient like that, each color is placed at the edges of the mesh.
The placement of our colors is controlled by passing them to the MeshGradient's initializer.
Before I explain further, I think it's a good idea to take a look at the code that's needed to create a mesh gradient.
MeshGradient(
    width: 2,
    height: 2,
    points: [
        .init(x: 0, y: 0), .init(x: 1, y: 0),
        .init(x: 0, y: 1), .init(x: 1, y: 1),
    ] ,
    colors: [
        .red, .orange,
        .purple, .blue
    ]
)
In this code, you can see that the way that we create this gradient is by giving that width and height that we just talked about and then a list of points. This list of points tells the mesh gradient exactly where inside of the mesh each color exists.
So the first color in this case exists in the top left (0, 0), and then we move to the next point which is going to be top right which is (1, 0). What's interesting to note is that we specify these positions by columns and rows. So we start off top left and then the top right and then the next one becomes bottom left.
The positions we pass are always values between zero and one, and they represent a relative position within the mesh. No matter how large or small your gradient gets, the gradient is going to know exactly where everything should be based on our relative positions.
The fourth and last argument that you can see as well in the code snippet is colors. colors is a list of all the colors that we want to use. So if we have a width of 2 and a height of 2, then we specify 4 colors. The order of the colors the same as how our positioning works. So in this case, red, orange, purple, blue means:
- Red is going to be top left
- Orange is going to be top right
- Purple is going to be bottom left
- Blue is going to be bottom right
Even if we place the first color at something like, for example, the bottom right position the system is still going to calculate the gradients as if red is positioned (roughly) in the top left. Feel free to play around with this a little bit yourself to see what I mean.
Changing your color locations
In addition to providing whole values like 0 and 1, we can also provide decimal values like 0.5. The result is not always exactly aesthetically pleasing because if we, for eg., give our first color (the red color) an x value of 0.5, the result looks a little bit like this.
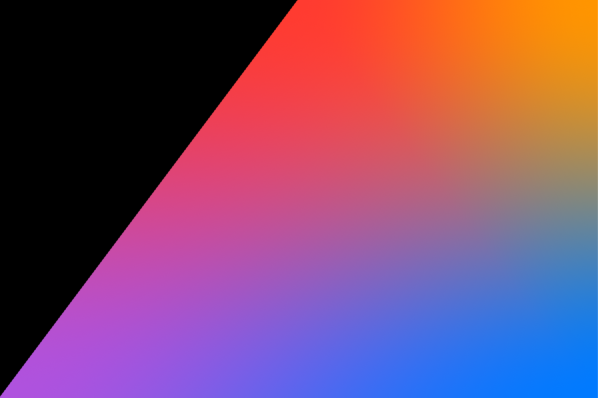
You can see that suddenly the gradient sorts of cuts off, which means that there's a straight line drawn from the bottom left position all the way up to the position wherever our red color is going to be, and we don't really cover the area that's remaining. So we're now left with a huge gap, and that's not necessarily desirable.
Typically, what you'll do is you'll have your gradients always sit at the corners. If we did want to play around with a color in the middle, we could actually make a gradient grid of 3x3 and then play around with that middle value. The gradient you saw at the start of this post could be adjusted a little bit and end up looking like this:
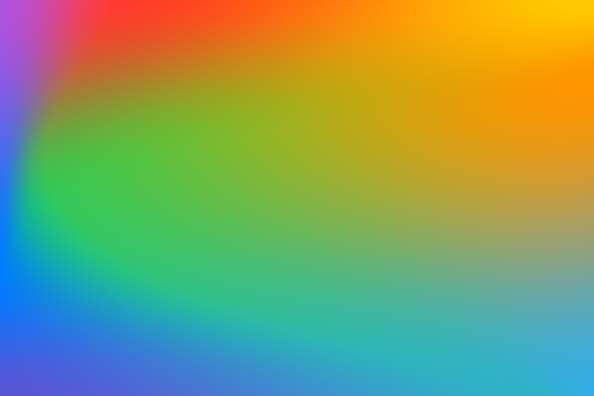
This effect was achieved by moving around all of the gradient points except those at the corners. The result is an even more interesting visual effect than the one you saw earlier.
That brings me to animating a mesh gradient. Let's go ahead and take a look at that next.
Animating a mesh gradient
We can make our mesh gradients animate using several techniques. I will be using a timer-based animation here because that is what I like to use most. If you prefer to use something else, you're completely free to do that, of course.
Let's go ahead and look at the code that creates our animation. You can see it down below. Overall, this code doesn't really do anything fancy. It just moves our gradient in a random direction within a scope around the base position. The effect is pretty cool. It kind of looks like there's a spotlight going around the canvas. I really like it. It's really not that hard to achieve, and that's really the power of the mesh gradient API.
struct ContentView: View {
    @State var positions: [SIMD2<Float>] = [
        .init(x: 0, y: 0), .init(x: 0.2, y: 0), .init(x: 1, y: 0),
        .init(x: 0, y: 0.7), .init(x: 0.1, y: 0.5), .init(x: 1, y: 0.2),
        .init(x: 0, y: 1), .init(x: 0.9, y: 1), .init(x: 1, y: 1)
    ]

    let timer = Timer.publish(every: 1/6, on: .current, in: .common).autoconnect()

    var body: some View {
        MeshGradient(
            width: 3,
            height: 3,
            points: positions,
            colors: [
                .purple, .red, .yellow,
                .blue, .green, .orange,
                .indigo, .teal, .cyan
            ]
        )
        .frame(width: 300, height: 200)
        .onReceive(timer, perform: { _ in
            positions[1] = randomizePosition(
                currentPosition: positions[1],
                xRange: (min: 0.2, max: 0.9),
                yRange: (min: 0, max: 0)
            )

            positions[3] = randomizePosition(
                currentPosition: positions[3],
                xRange: (min: 0, max: 0),
                yRange: (min: 0.2, max: 0.8)
            )

            positions[4] = randomizePosition(
                currentPosition: positions[4],
                xRange: (min: 0.3, max: 0.8),
                yRange: (min: 0.3, max: 0.8)
            )

            positions[5] = randomizePosition(
                currentPosition: positions[5],
                xRange: (min: 1, max: 1),
                yRange: (min: 0.1, max: 0.9)
            )

            positions[7] = randomizePosition(
                currentPosition: positions[7],
                xRange: (min: 0.1, max: 0.9),
                yRange: (min: 1, max: 1)
            )
        })
    }

    func randomizePosition(
        currentPosition: SIMD2<Float>,
        xRange: (min: Float, max: Float),
        yRange: (min: Float, max: Float)
    ) -> SIMD2<Float> {
        var updateDistance: Float = 0.01

        let newX = if Bool.random() {
            min(currentPosition.x + updateDistance, xRange.max)
        } else {
            max(currentPosition.x - updateDistance, xRange.min)
        }

        let newY = if Bool.random() {
            min(currentPosition.y + updateDistance, yRange.max)
        } else {
            max(currentPosition.y - updateDistance, yRange.min)
        }

        return .init(x: newX, y: newY)
    }
}
In addition to the code, I think it's interesting to take a look at the result, which is shown down below.

Both the effect and the code are pretty simple examples of what we can do. There are a lot of other ways to achieve similar, the same or better results. So I hope this just provides a starting point for you, so that you know what you can do and to inspire you on how you could get started animating your mesh gradients.
There's not much else to say about mesh gradients and animating them.
To explore meshes and animations more, you could also play around with the points array and give it bezier points instead of plain points. That gets you more freedom and allows you to change how the mesh gradient interpolates how colors should blend. It is really hard to do this well, so I'm not going to dig into that too much.
I think if you're comfortable with bezier points, you're going to be able to use this. If you're not comfortable with that like me, it's going to be a lot harder. So yeah, not going to cover that one. Now that you've seen how to animate a mesh gradient, let's talk a little bit about where and when it makes sense to use them.
Where and when to use mesh gradients
Like any UI effect, mesh gradients can be applied tastefully and properly, or they can be applied in a very overbearing way, which basically makes them look bad in your UI. I think what's important to realize is that mesh gradients do take up a lot of visual space from the user. So it doesn't affect that you're going for, they make total sense. I also think that kind of makes sense as a background kind of view.
A really interesting effect that I've seen is to apply a little bit of a frosted overlay over your mesh gradient, which you can do by using the code below.
MeshGradient(
    width: 3,
    height: 3,
    points: positions,
    colors: [
        .purple, .red, .yellow,
        .blue, .green, .orange,
        .indigo, .teal, .cyan
    ]
)
.frame(width: 300, height: 200)
.overlay(.ultraThinMaterial)
If you do that, your gradient will be a bit more muted as shown in the picture down below.
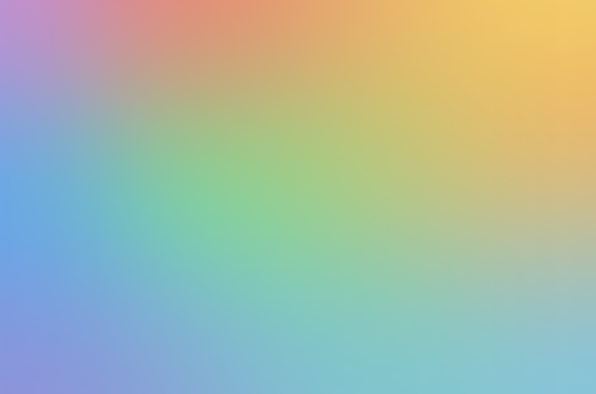
If you apply the effect like that, what happens is that the mesh gradient becomes a lot more subtle and it really adds to your UI when used as a background view.
I would also make sure that you don't use colors that are too far apart. If the colors are somewhat similar, it creates this nice unified view, which is a lot more attractive to look at than something that is very out extreme like I did in my example.
Of course, it depends on what you're going for. But if you're going for something more subtle, that's what you want to do.
In Summary
To summarize what you've learned, in this post we took a look at mesh gradients. We looked at how they are written. You've seen how you can pass a list of points and a list of colors to create a mesh gradient quickly. You've also seen that mesh gradients allow you to move the positions of colors around and how making too extreme of an adjustment can result in strange looks (which maybe are exactly what you're looking for, probably not).
You've also seen how you can animate your mesh gradients. We wrap up the post by looking at how you can make sure that you apply mesh gradients in a tasteful manner instead of just going all in with them and going entirely overboard with something that's going to be way too much.
I think MeshGradient is going to be able to make some really cool UI effects. And I'm actually looking forward to apps implementing this because I would love to see how they make good use of this new API on iOS 18.
