Enabling upcoming feature flags for Swift using Xcode
Published on: April 18, 2024Updated on: May 19, 2025
If you’re keen on reading about what’s new in Swift or learn about all the cool things that are coming up, you’re probably following several folks in the iOS community that keep track and tell you about all the new things. But what if you read about an upcoming Swift feature that you’d like to try out? Do you have to wait for it to become available in a new Xcode release?
Sometimes the answer is Yes, you’ll have to wait. But more often than not a Swift evolution proposal will have a header that looks a bit like this:

Notice the Implementation on main and gated behind -enable-experimental-feature TransferringArgsAndResults. This tells us that if you were to Swift directly from its main branch you would be able to try out this new feature when you set a compiler flag.
Sometimes, you’ll find that the implementation is marked as available on a specific branch like release/5.10 or release/6.0. Without any information about gating the feature behind a flag. This means that the feature is available just by using Swift from the branch specified.
This is great, but… how do you actually use Swift from a specific branch? And where and how do we pass these compiler flags so we can try out experimental features in Xcode? In this post, I’ll answer those questions!
If you prefer learning from videos, I got you. The video below covers the exact same topic:
Installing an alternative Swift toolchain for Xcode
Xcode uses a Swift toolchain under the hood to compile your code. Essentially, this means that Xcode will run a whole bunch of shell commands to compile your code into an app that can run on your device or simulator. When you have the Xcode command line tools installed (which should have happened when you installed Xcode), you can open your terminal and type swift --version to see that there’s a command line interface that lets you use a Swift toolchain.
By default, this will be whichever toolchain shipped with Xcode. So if you have Xcode 15.3 installed running swift --version should yield something like the following output:
❯ swift --version
swift-driver version: 1.90.11.1 Apple Swift version 5.10 (swiftlang-5.10.0.13 clang-1500.3.9.4)
Target: arm64-apple-macosx14.0
We can obtain different versions of Swift quite easily from swift.org on their download page.
Here you’ll find different releases of Swift for different platforms. The topmost section will show you the latest release which is already bundled with Xcode. If we scroll down to snapshots however there are snapshots for Trunk Development (main) and upcoming Swift releases like Swift. 6.0 for example.
We can click the Universal download link to install the Swift toolchain that you’re interested in. For example, if you’re eager to try out a cutting edge feature like Swift 6’s isolation regions feature you can download the trunk development toolchain. Or if you’re interested in trying out a feature that has made its way into the Swift 6 release branch, you could download the Swift 6.0 Development toolchain.
Once you’ve downloaded your toolchain and you can install it through a convenient installer. This process is pretty self explanatory.
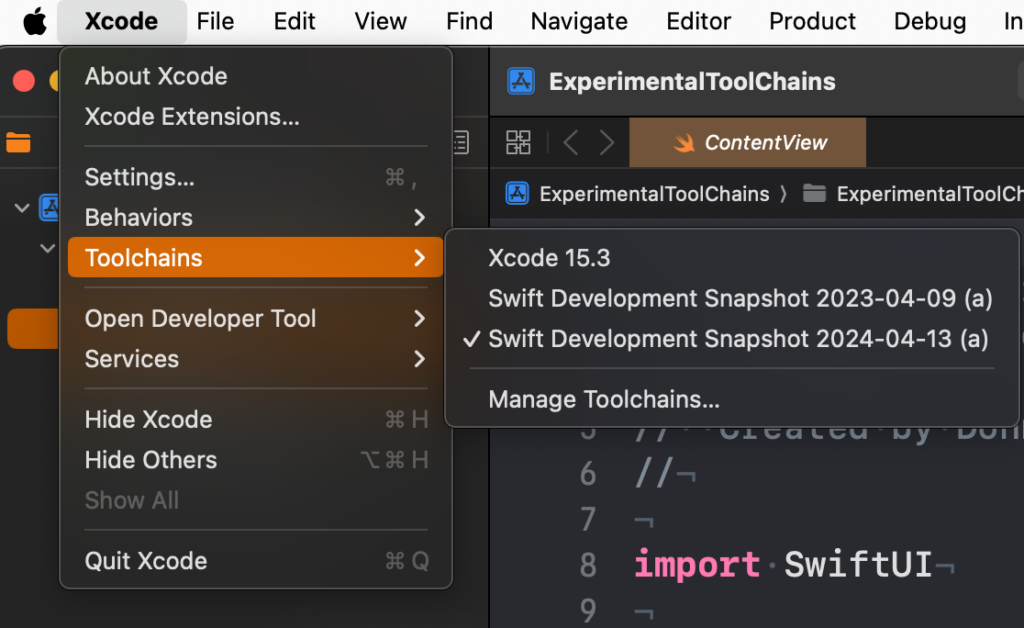
After installing the toolchain, you can activate this new Swift version in Xcode through the Xcode → Toolchains menu. In the screenshot below you can see that I’m using the Swift Development Snapshot 2024-04-13 (a) toolchain. This is the trunk development toolchain that you saw on swift.org.

Once you’ve selected this toolchain, Xcode will use that Swift version to compile your project. This means that if your project is compatible with that Swift version, you can already get a sense of what it will be like to compile your project with a Swift version that’s not available yet.
Note that this may not be entirely representative of what a new Swift version like Swift 6 will be like. After all, we’re using a snapshot built from Swift’s main branch rather than its release/6.0 branch which is what the Swift 6.0 development toolchain is based off of.
Sometimes I’ve found that Xcode doesn’t like swapping toolchains in a project that you’re actively working on and compiling all the time. You’ll see warnings that aren’t supposed to be there or you’ll be missing warnings that you expected to see. I’m pretty sure this is related to Xcode caching stuff in between builds and rebooting Xcode usually gets me back where I’d like to be.
Now that we can use a custom toolchain in Xcode, let’s see how we can opt-in to experimental features.
Trying out experimental Swift features in Xcode
To try out new Swift features, we sometimes need to enable them through a compiler flag. The evolution proposal that goes along with the feature you’d like to try will have an Implementation field in its header that explains which toolchain contains the feature, and whether the feature is gated behind a flag or not.
For example, you might want to try out SE-0414 Region based isolation to see whether it resolves some of your Swift Concurrency warnings.
We’ll use the following code (which is also used as an example in the Evolution proposal) as an example to see whether we’ve correctly opted in to the feature:
// Not Sendable
class Client {
  init(name: String, initialBalance: Double) {  }
}

actor ClientStore {
  var clients: [Client] = []

  static let shared = ClientStore()

  func addClient(_ c: Client) {
    clients.append(c)
  }
}

func openNewAccount(name: String, initialBalance: Double) async {
  let client = Client(name: name, initialBalance: initialBalance)
  await ClientStore.shared.addClient(client) // Warning! 'Client' is non-`Sendable`!
}
To get the warning that we’re expecting based on the code snippet, we need to enable strict concurrency checking. If you’re not sure how to do that, take a look at this post.
After enabling strict concurrency you’ll see the warning pop up as expected.
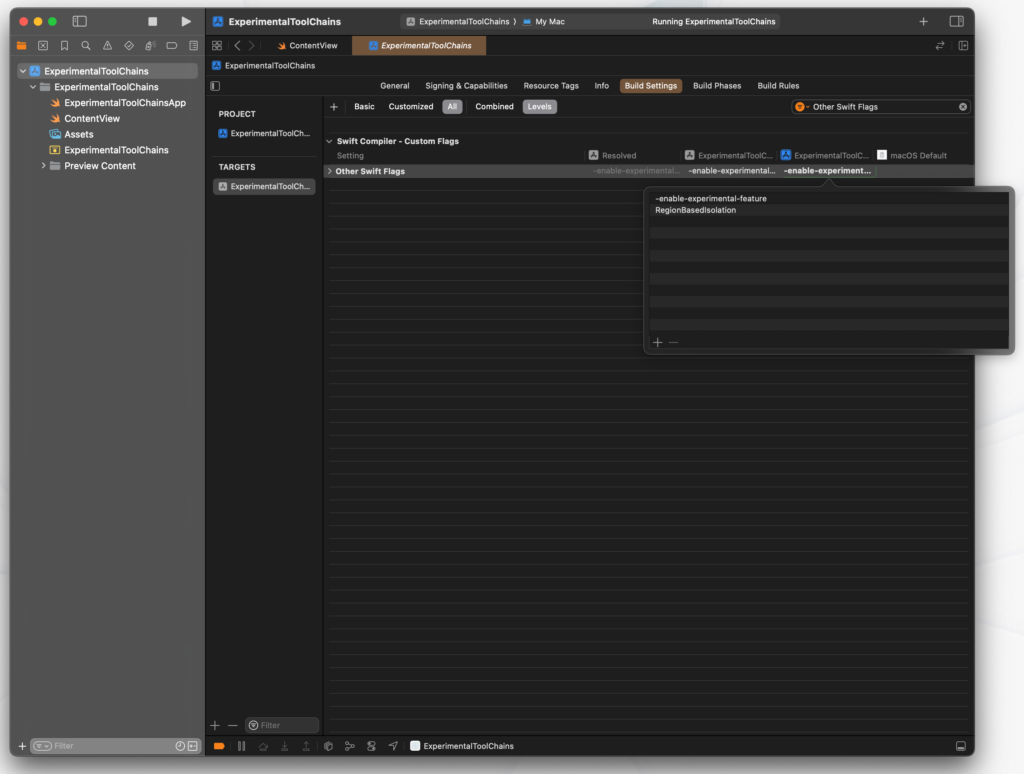
Now, make sure that you have your new toolchain selected and navigate to your project’s build settings. In the build settings search for Other Swift Flags and make sure you add entries to have your flags look as shown below:

Notice that I’ve placed -enable-experimental-feature and RegionBasedIsolation as separate lines; not doing this results in a compiler error because the argument won’t be passed correctly.
If you build your project after opting in to the experimental feature, you’ll be able to play around with region based isolation. Pretty cool, right?
You can enable multiple experimental feature by passing in the experimental feature flag multiple times, or by adding other arguments if that’s what the Evolution proposal requires.
In Summary
Experimenting with new and upcoming Swift features can be a lot of fun. You’ll be able to get a sense of how new features will work, and whether you’re able to use these new features in your project. Keep in mind that experimental toolchains shouldn’t be used for your production work so after using an experimental toolchain make sure you switch back to Xcode’s default toolchain if you want to ensure that your main project correctly.
In this post you’ve also seen how you can play around with experimental Swift features which is something that I really enjoy doing. It gives me a sense of where Swift is going, and it allows me to explore new features early. Of course, this isn’t for everyone and since you’re dealing with a pre-release feature on a pre-release toolchain anything can go wrong.


